Welcome to Moda Fabrics!
At the Seashore - Melt
At the Seashore - Melt
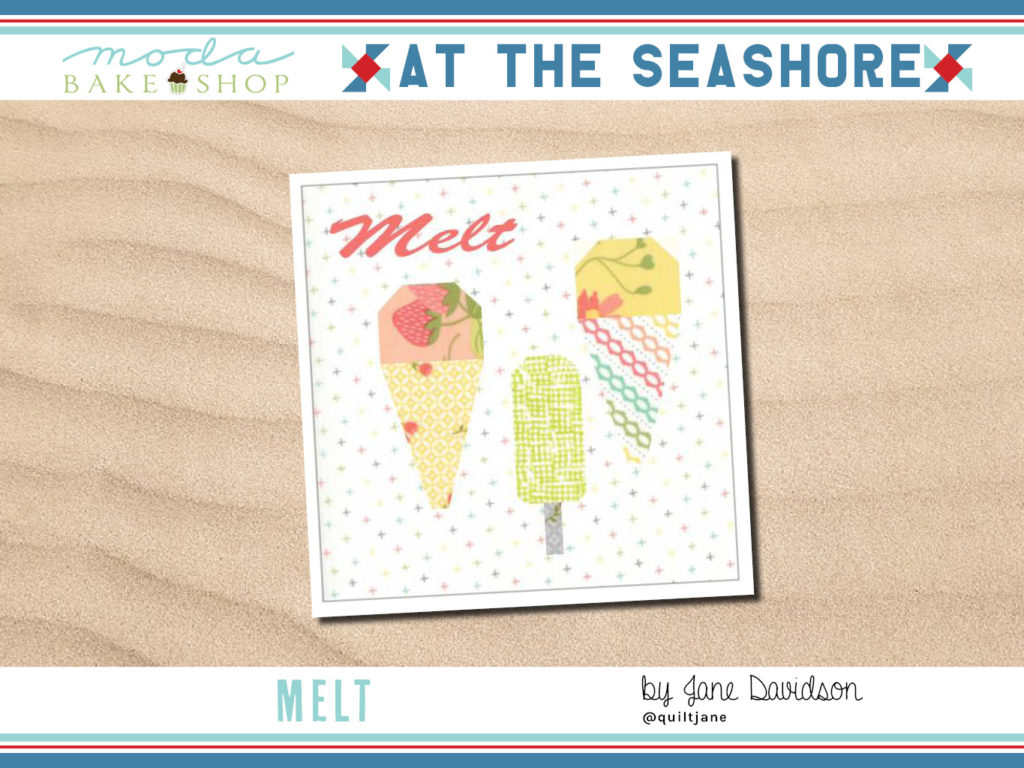
Hi, all you Summer beach-goers. There is nothing more splendid than a day at the beach. I was lucky to be a beach babe, growing up in the Port Hacking, south of Sydney, Australia. Summer by the ocean was especially, a magical time as our days were filled with water skiing, sailing and fishing from sun up to sun down. I can never forget the feel of the sun on my skin, the sultry heat of a Sydney summer and the smell of salt from the ocean.
This post is part of our summer quilt-along series. Find the rest of the posts by clicking {here}.
One of my favourite memories of summer was visiting Strawberry Fair at Cronulla. It was an ice-creamery that had 100 flavours! My favourites were musk stick, lime and pineapple and bubblegum. My block today is all about ice-cream and ice blocks. (A little cultural exercise in translation - we Aussies call a popsicle an ice-block if it is made without milk and an ice-cream if made with milk. To confuse you even more, we call ice-cream in a cone, ice-cream as well).
Fabrics are from Rubystar Society.
- Background: 1 Fat Quarter 18” x 22” of light fabric
- Ice-cream cones: 2 squares - 5” x 5” of yellow/light orange prints
- Ice-cream: 2 rectangles - 2 ¾” x 3 ½” of green and pink prints (L)
- Ice-block: 1 rectangle - 2½” x 4 ¾” orange print (O)
- Ice-block stick: 1 rectangle - 1” x 2” brown print (N)
- Template plastic or cardboard.
- {optional} embellish the ice-cream cones with themed buttons such as cherries or strawberries. Add ocean themed novelty buttons to the blocks, such as seaguls, crabs, starfish, and turtles.
Preparation
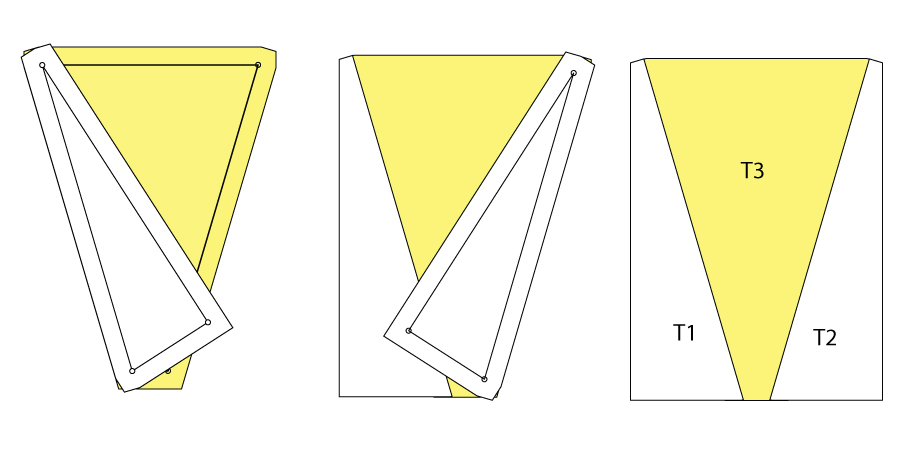
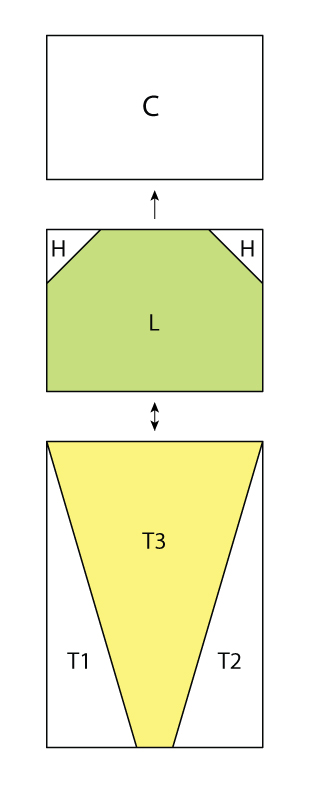
Make templates T1, T2 and T3 - Download templates here.
* For the foundation paper piecing enthusiasts you can download the templates here*
Cutting
From the background fabric cut:
- 2 strips - 1 ½” x 12 ½” (A)
- 2 strips - 1 ½” x 10 ½” (B)
- 1 rectangle - 2 ½” x 3 ½” (C)
- 1 rectangle - 4 ½” x 4 ¾” (D)
- 2 strips - 1 ½” x 4 ¾” (E)
- 1 rectangle - 2” x 5 ¼” (F)
- 1 rectangle - 2” x 2 ¼” (G)
- 4 squares - 1 ¼” x 1 ¼” (H)
- 2 squares - 1” x 1” (I)
- 2 squares ¾” x ¾” (J)
- 1 rectangle - 3” x 3 ½” (K)
- 1 rectangle - 1 ½” x 3 ½” (P)
- Using template T1 cut 2 triangles
- Using template T2 cut 2 triangles
From the Ice-cream cones fabric, using T3 cut:
- 2 ice-cream cones
BLOCK ASSEMBLY
Ice-cream Cones
- Sew T1 to left side of T3. Press towards T1.
- Sew T2 to the right side of T3. Press towards T2.
- Make 2 ice-cream cones.
Ice-Cream
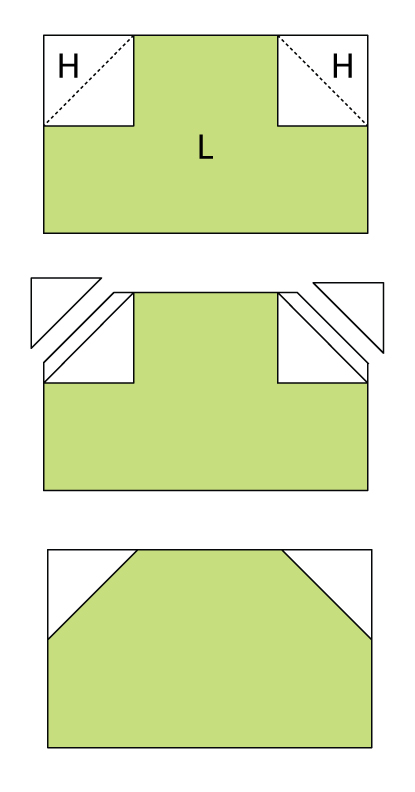
- Place a 1 ¼” x 1¼” square (H) on top, left-hand corner of 2 ¾” x 3 ½” rectangle (L).
- Sew on the drawn line.
- Trim a ¼” away from stitched line.
- Press triangle back.
- Repeat on the other side.
- Make 2 ice-creams
Ice-block
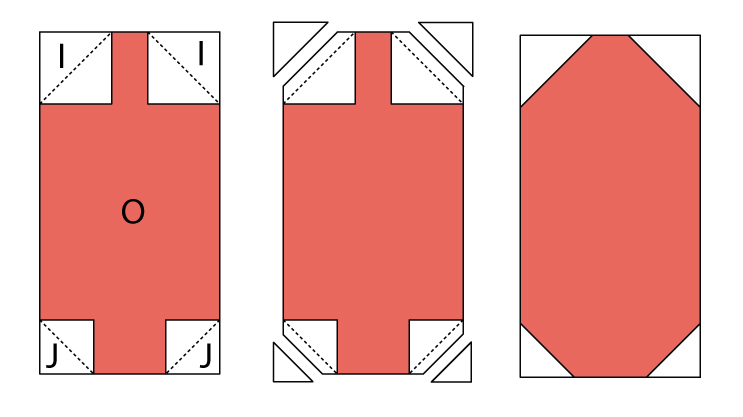
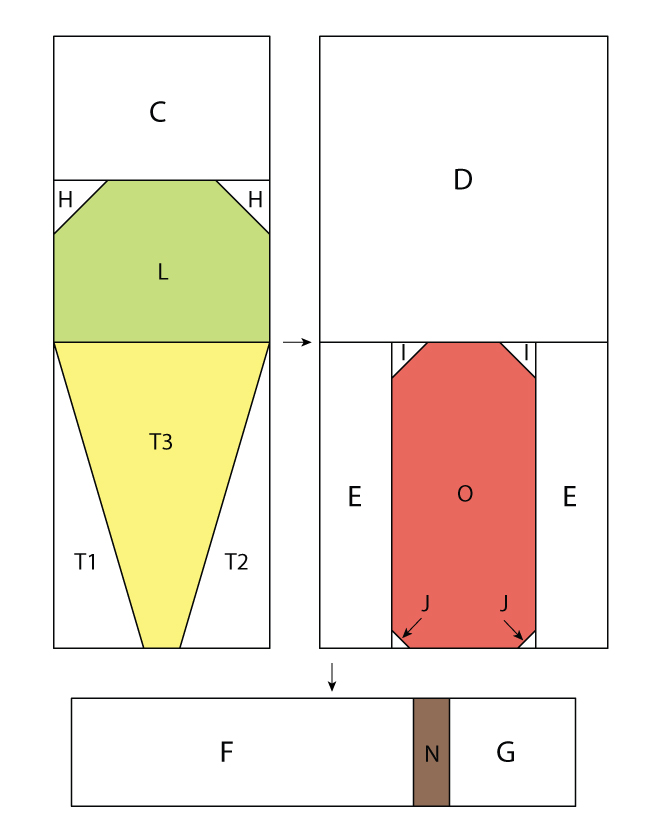
- Place a 1” x 1” square (I) on top corners of a 2½” x 4 ¾” (O) rectangle.
- Sew on the drawn line.
- Trim a ¼” away from the stitch line.
- Press triangles back.
- Place a ¾” x ¾” square (J) on bottom corners of (O) rectangle.
- Trim a ¼” away from the stitch line.
- Press triangles back.
Units
- Make units 1 to 6. Press in the direction of the arrows.
Unit 1
Unit 2
Unit 3
Unit 4
Unit 5
Unit 6
Block Borders
- Sew piece B - 1 ½” x 10 ½” to sides of the block.
- Sew piece A - 1 ½” x 12 ½” to top and bottom of the block.
This block finishes at 12" x 12". (12 1/2" x 12 1/2" unfinished).
Looking for more summer-themed blocks, visit my website to download 3 extra blocks and see a glimpse of my completed quilt.
Jane Davidson
Find me at
Website
Instagram @quiltjane
e-store Patterns and notions.
Facebook - Want it Need it Quilt






Comments