Welcome to Moda Fabrics!
Pinwheel Puzzle Quilt
Pinwheel Puzzle Quilt
Hello there! I'm Kirsty and I blog about my quilt-making adventures over at Bonjour Quilts. Today I have a fun lap quilt design that I hope will make you look at the humble pinwheel in a different light!
This quilt finishes at 52" x 65".
I have made this quilt with the Bright Sun line by Sherri and Chelsi for Moda. (The exact fabrics I used are in brackets after each ingredient, should you wish to copy this recipe to a tee.)
3 FQs pink fabric (Magenta Mojave)
6 FQs turquoise fabric (2 each of Midnight Canyon, Midnight Arrow and Turquoise Weave)
OR 3 half yards turquoise fabric
3 FQ light neutral (Dusk on Bisque Arrow)
2 yds darker neutral (Dusk Weave)
Fabric to piece a backing.
Batting/wadding.
Cutting
From the light neutral FQs cut ten 9” squares.
From the pink FQs cut ten 9” squares.
From the turquoise FQs cut twenty 9” squares. Retain left overs for binding.
From the dark neutral yardage cut eight 8” strips (8” x WOF).
Sub-cut each 8” strip to give five 8” squares. Yields a total of forty 8” squares.
Piecing HSTs
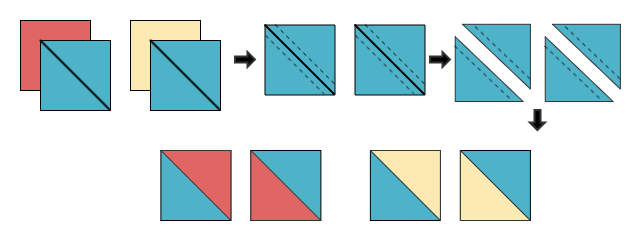
I prefer the “oversize then trim back” method of sewing HSTs.
Take the twenty 9” turquoise squares and draw a diagonal pencil line, corner to corner on the wrong side of the fabric. Divide the squares into two piles of 10, roughly distributing the prints evenly.
Match one pile of ten 9” turquoise squares with the ten 9” pink squares, right sides together.
Match one pile of ten 9” turquoise squares with the ten 9” light neutral squares, right sides together.
Sew the squares together with two seams, a quarter inch from both sides of the drawn diagonal line.
Cut the units apart along the drawn diagonal and press the units open, seams to the side and toward the turquoise triangle. Trim the units to 8” squares.
Piecing Split Quarter Square Triangles (SQSTs)
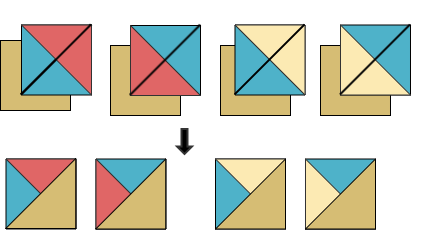
Take the 40 HST units and draw a diagonal pencil line, corner to corner on the wrong side of the fabric. This line will form a cross with (be perpendicular to) the HST seam line diagonal.
Match each HST unit with a dark neutral 8” square, right sides together.
Sew the squares together with two seams, a quarter inch from both sides of the drawn diagonal line.
Cut the units apart along the drawn diagonal and press the units open, seams to the side, toward the larger, single triangle. Trim the units to 7” squares.
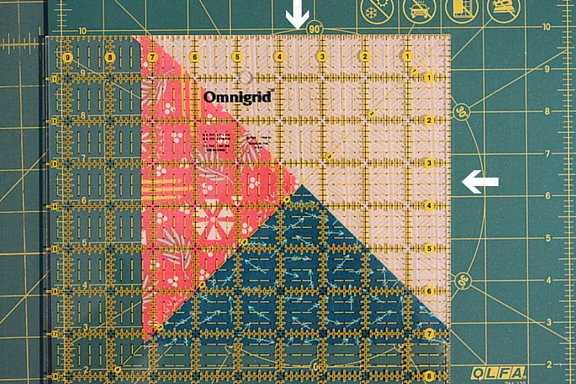
Note on trimming: It is important to ensure the central point (where the three triangles meet) is indeed central. As our block is 7” - make sure the centre point is exactly 3.5” from each block edge. See photo below:
Above: the arrows show the centre point lined up with 3.5” on the square ruler. There is a dashed diagonal on the ruler which is used to line up a diagonal on the block. As my ruler doesn’t have both diagonals marked, I made sure my the inch square intersections line up with my other diagonal.
When the SQST units are cut apart the blocks formed are mirror images - thus there will be 4 different block types within the 80 units (two types neutral/turquoise and two types neutral/pink).
Take time now to sort the blocks into their four groups of 20 blocks.
Pinwheel Block Layout
Each of the four groups of 20 blocks will yield 5 pinwheels. Lay out the SQST blocks in sets of 4 to form 20 pinwheels.
5 neutral/turquoise blocks turning to the left,
5 neutral/turquoise blocks turning to the right,
5 neutral/pink blocks turning to the left, and
5 neutral/pink blocks turning to the right.
Sewing Pinwheel Blocks
For each pinwheel layout sew the top two units together, followed by the bottom two to form two pinwheel halves.
In both cases press the seam to the side with two smaller triangles.
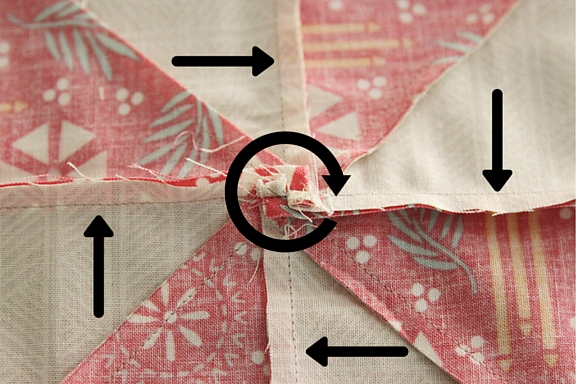
Sew the top and bottom halves together, nesting the seams. Press this seam open or better yet, swirl the seam.
To swirl the seam:
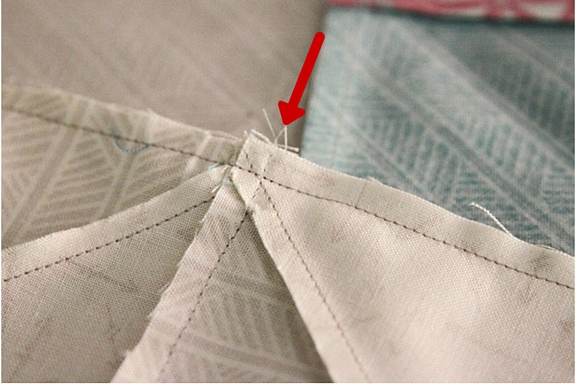
Identify the seams perpendicular to the one just sewn - they will be the seams used to sew the top and bottom pinwheel quarters together before the halves were joined. Unpick the outermost three or so stitches from these seams - those that lay within the seam allowance of the seam just sewn.
Once these stitches are removed, the centre point seam where all four blocks meet will be able to “fan out” around the centre point, greatly reducing the bulk of this intersection. The seams that radiate out from the middle will also fall naturally in the same direction (either clockwise or counter-clockwise).
Quilt Top
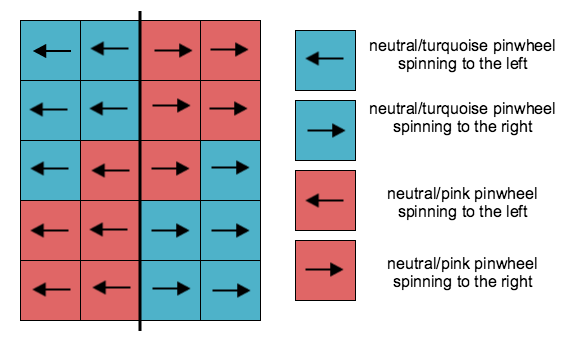
Lay out the pinwheel blocks in a 4 x 5 block layout, keeping those that “spin the same way” together (see below).
It really doesn’t matter how you interpret “spinning to the right” or “spinning to the left”. Just choose your definition and stick to it. As long as all pinwheels on the same side of the quilt are spinning the same way, it’ll be fine.
Sew the blocks together in rows and either swirl the seams or press open.
Sew the rows together to form the quilt top. Press seams open.
Finish the Quilt
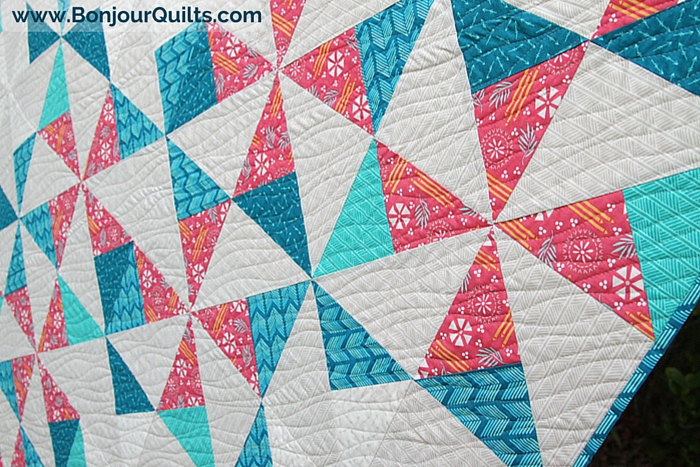
Back, baste and quilt the quilt top with your preferred quilting style. I have chosen to quilt with slightly wavy diagonal lines across the quilt.
Use the leftover portions of turquoise (and pink, if preferred) fabric to form a scrappy binding of the preferred thickness and then bind your quilt. Snuggle and enjoy!
This quilt finishes at 52" x 65" and is great for cuddling under on the couch, building quilt forts or hiding beneath when the world isn't treating you the way you'd like.
If you make a Pinwheel Puzzle quilt of your own I'd love to see it. Please tag me on Instagram (@bonjour_quilts and #modabakeshop) or get in contact through my website, Bonjour Quilts. Happy Sewing!
Kirsty @ www.BonjourQuilts.com


