Welcome to Moda Fabrics!
All In A Row Quilt
All In A Row Quilt
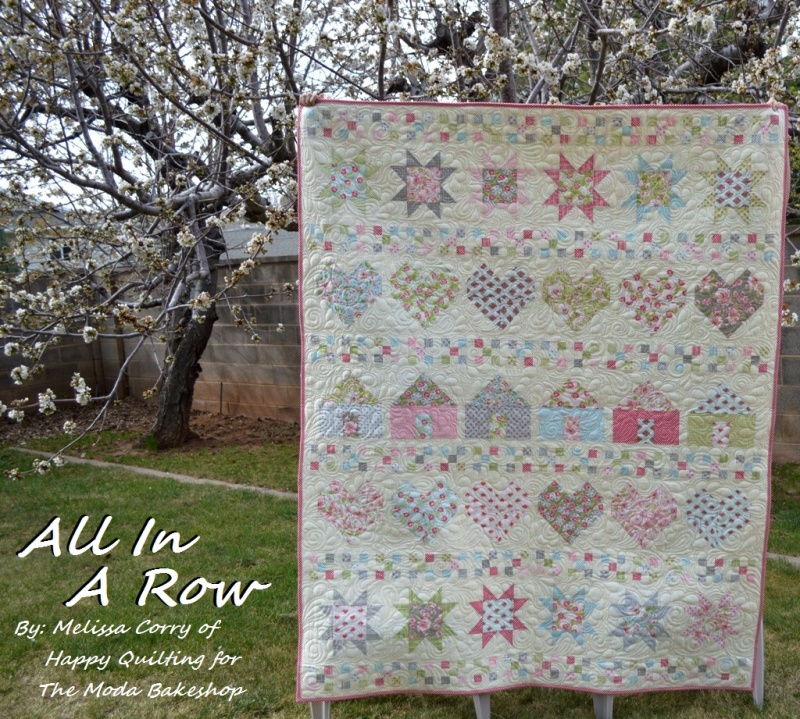
Hello Fellow Moda Bake Shop Friends. It's Melissa from Happy Quilting again and I am so excited to share this new quilt tutorial with you today ;) Last Market I was instantly drawn to the beautiful Ambleside prints of Brenda Riddle's first line with Moda!!! I knew it was exactly perfect for a special quilt I had in mind for a very special person on a very special occasion. And I am super excited to be sharing that quilt with you. So here it is, All In A Row. Let's get right to it ;)
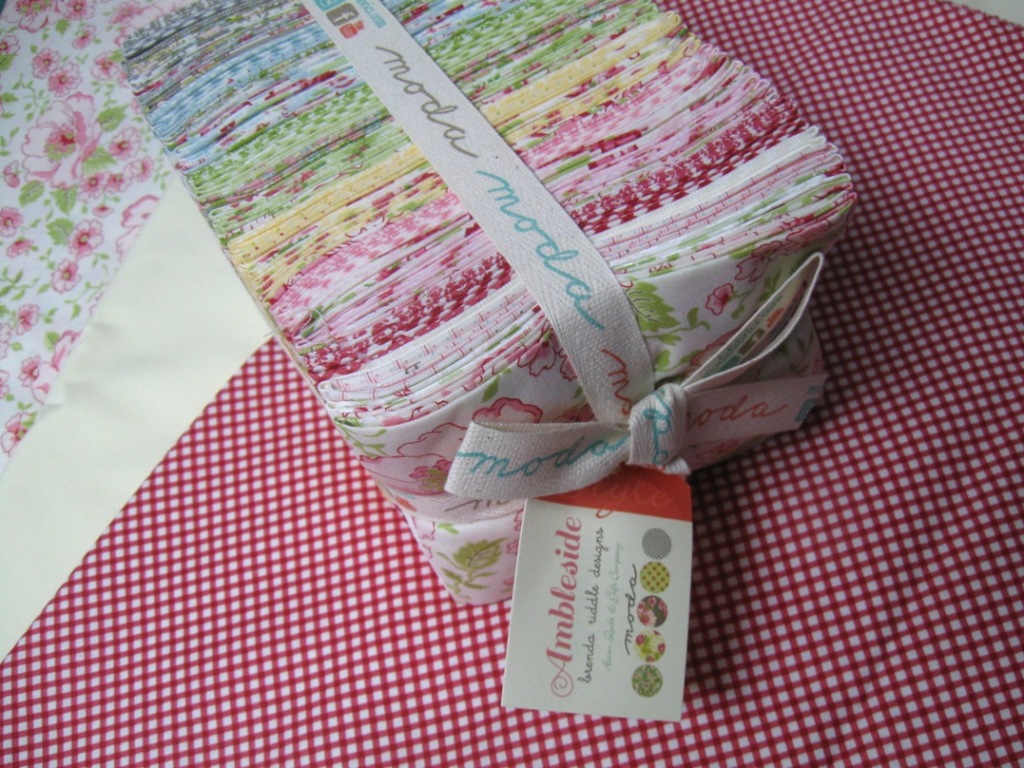
1 Ambleside Fat Eighth Bundle
4 1/4 Yards of Moda Bella Solids Cream
½ Yard of your favorite Ambleside Print for Binding ( I used 18606 11)
4 Yards of your favorite Ambleside Print for Backing (I used 18600 11)
STEP 1 - CUTTING
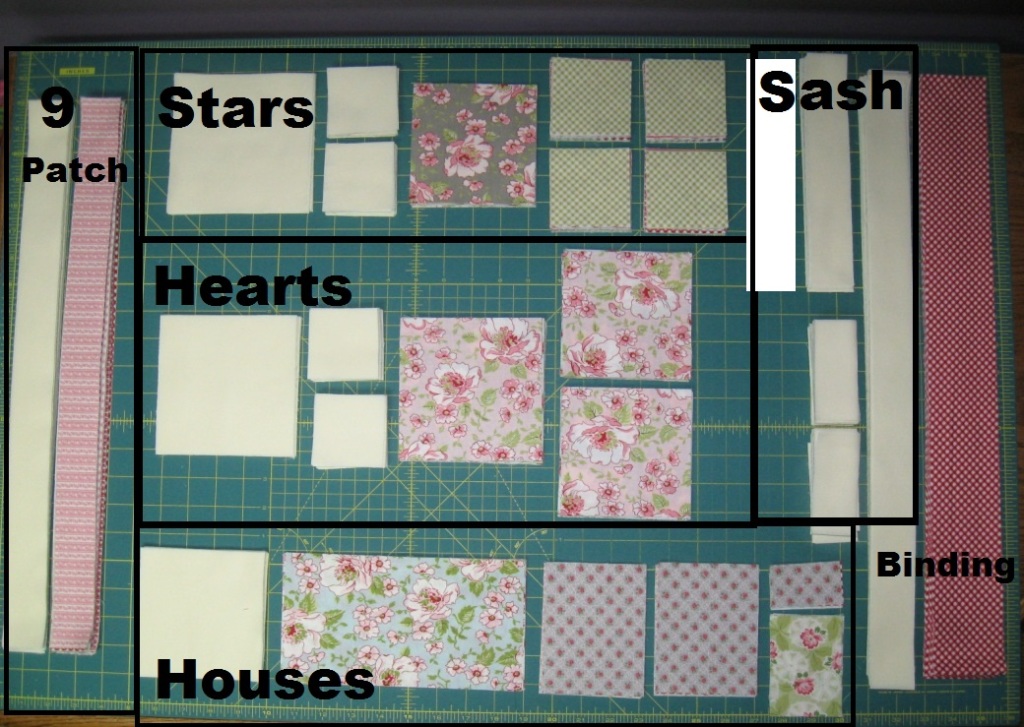
To begin, press your Fat Eighth's so they are nice and flat. Then I sorted mine into 2 piles, the larger floral prints and the small tone on tone prints. I liked having these two groups separate and used them specifically in cutting that I will mention below, but it is not necessary to follow that. The cutting will be broken down by block, I found it easiest to cut what I needed for each block and then label those pieces with the block name and keep them in piles broken down by blocks.
For the Nine Patch Blocks you will need to cut:
(35) 1½" x 20" strips from the assorted small tone on tone prints.
(28) 1½" x 20" strips from the cream solid.
For the Star Blocks you will need to cut:
From each of 12 assorted large floral prints, cut (1) 4½" square for a total of (12) 4½" squares
From each of 12 assorted small tone-on-tone, prints cut (4) 2 7/8" x 2 7/8" " squares for a total of (48) 2 7/8" x 2 7/8" squares
(12) 5 1/4" x 5 1/4" squares from the cream solid
(48) 2½" squares from the cream solid
For the Heart Blocks you will need to cut:
From each of 12 assorted large floral prints cut (1) 5" x 5" square and (2) 4½" squares for a total of (12) 5" and (24) 4½" squares
(12) 5" x 5" squares from the cream solid
(48) 2½" squares from the cream solid
For the House Blocks you will need to cut:
From each of 6 small tone on tone prints cut (2) 3½" x 4½" rectangles and (1) 1½" x 2½" rectangle for a total of (12) 3½" x 4½" rectangles and (6) 1½" x 2½" rectangles
(6) 4½" x 8½" rectangles from the assorted large floral prints
(6) 2½" x 3½" rectangles from 6 other assorted large floral prints
(12) 4½" x 4½" squares from the cream solid
For the Sashing in the Quilt
(12) 1½" x Width of Fabric strips from the cream solid
(10) 2½" x 8½" rectangles from the cream solid
(25) 1½" x 8½" rectangles from the cream solid
(90) 1½" x 3½" rectangles from the cream solid
For the Binding of the Quilt
(7) 2½" x Width of Fabric strips from chosen Binding Fabric
I know, that seems like a lot of cutting, but breaking it out like this will save you a lot of headache down the road. And don't be afraid to stack up 3-4 Fat Eighths at a time to cut out some of those print fabrics, it will really speed things up ;)
STEP 2 - NINE PATCH BLOCKS
Note - Before I get started in this tutorial, I want to say that Chain Stitching can save you a lot of time along every step of the way in this tutorial, but I didn't have room to add pictures of each step chain stitched as it is already a long tutorial. But please note, that with every step and sub-step, I will be chain stitching. And for those that are new to quilting - Chain Stitching is when you finish sewing your first paired unit, rather than clipping your thread and moving onto the second unit, you just continue sewing without clipping your thread. Do this for all your units making a long chain ;) Then clip your threads and move on to the next step ;)
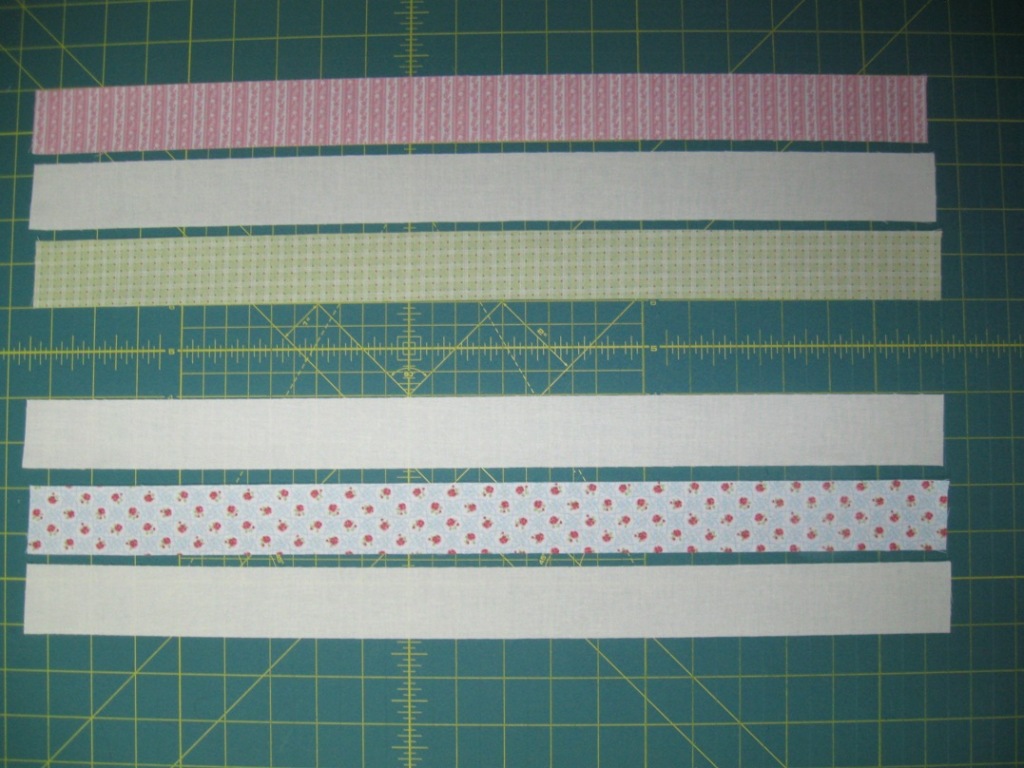
Okay, so now we are ready to start sewing. We will begin with some strip piecing. This saves a ton of time. Whenever strip piecing, I like to shorten my stitch length just a bit as I will be sub-cutting my fabrics and don't want my stitches unraveling when cut. We will begin by making 2 different strip sets using our 1½" x 20" strips. The first uses 2 prints and 1 solid strip and the second uses 2 solids and 1 print set laid out as shown below.
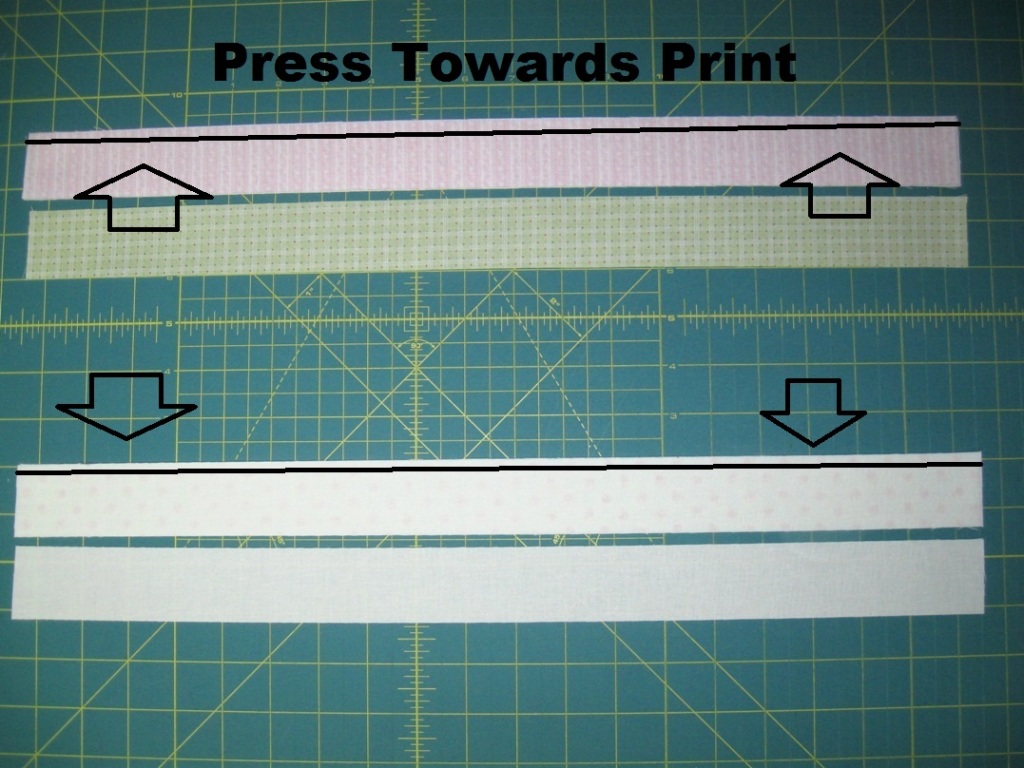
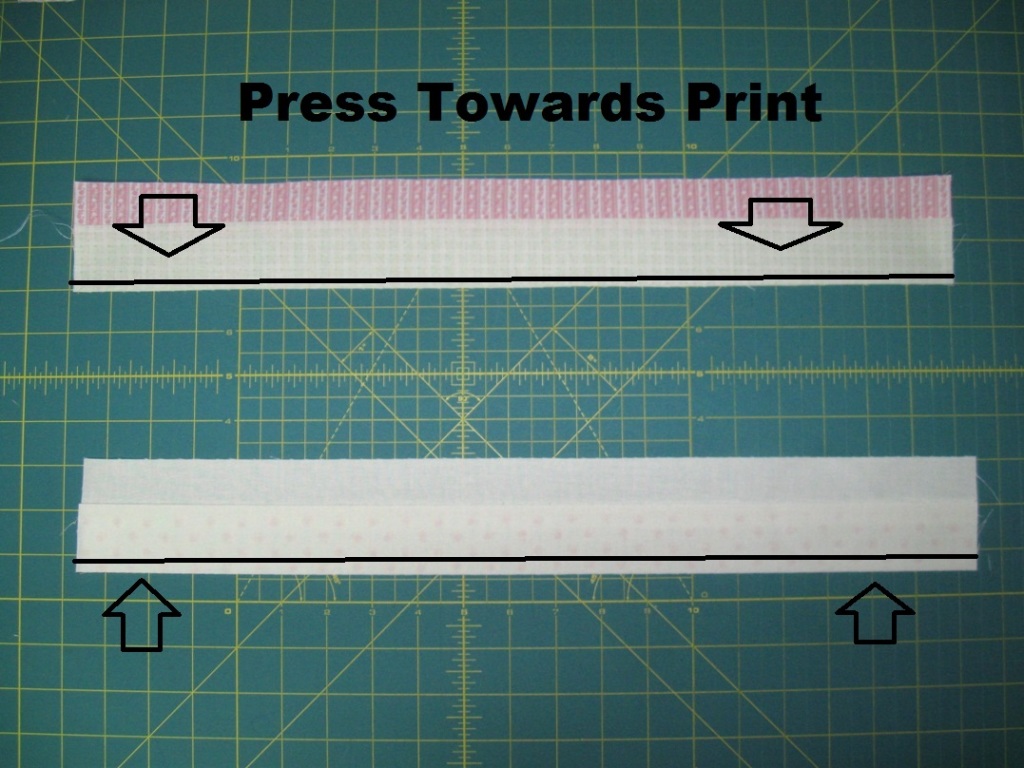
Place the top strip in each set onto the center strip with right sides together. Stitch a 1/4" seam. along the edge of each set aligning as you go. It is okay if the ends don't match up perfect. Press the seam allowance towards the print fabric.
Then place the bottom strip onto the center strip with right sides together. Sew a 1/4" seam along the edge, aligning as you go. Press the seam allowance towards the print fabric.
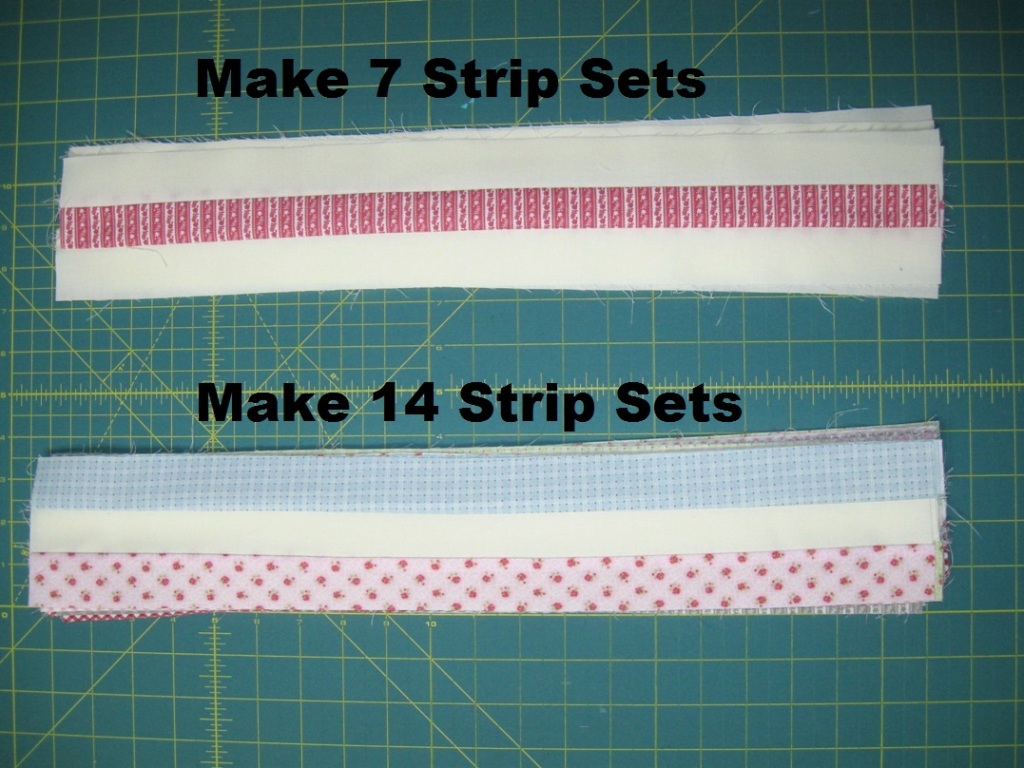
Chain stitch each of the 2 above steps to make 7 strip sets of the 2 solid and 1 print strips and 14 strip sets of the 2 print and 1 solid strips.
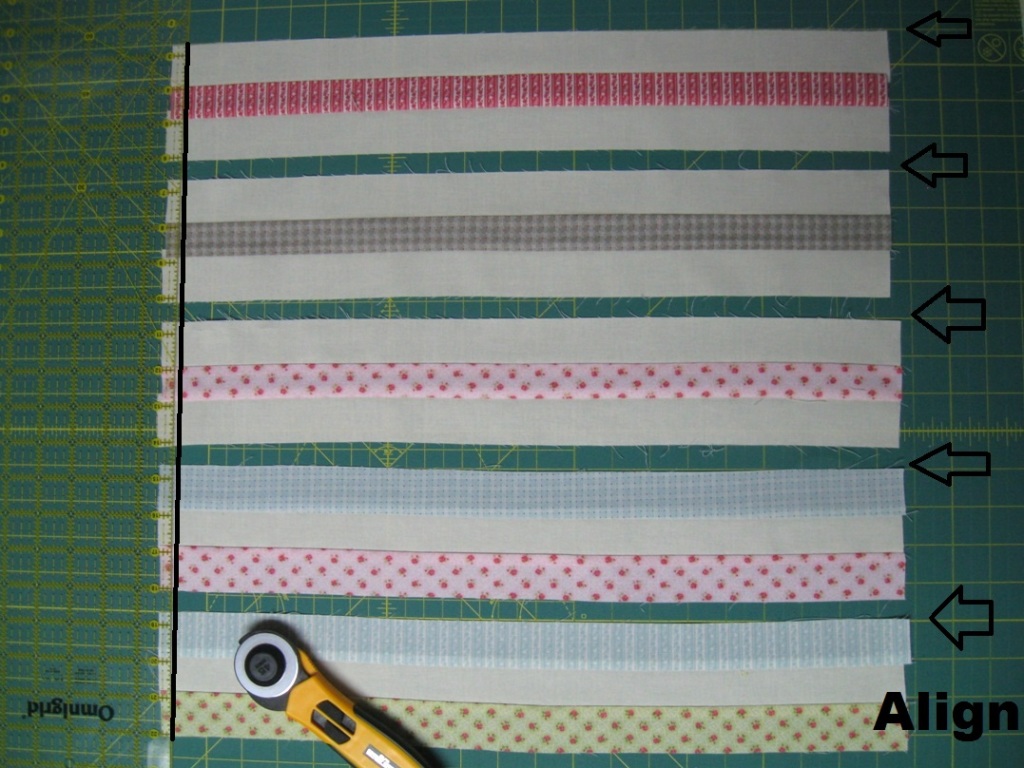
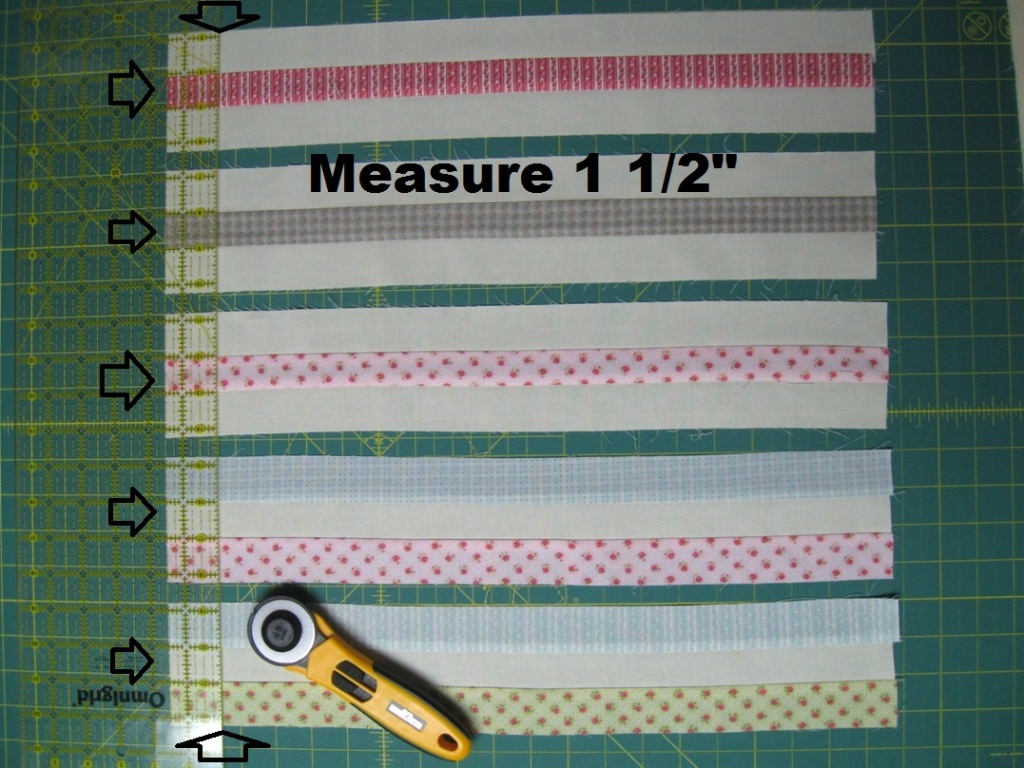
And now, it's time to make some little patchwork rows. Begin by aligning your strip sets along the horizontal lines of your mat. I don't like to stack these on top of one another as the seams can cause slippage. Place your ruler along the vertical line on your mat that is just over the edge of each strip set. Cut along the edge of your ruler to create a straight edge.
Now measure in 1½". You can double-check this measurement on both your mat and on your ruler. When aligned, cut along the edge of your ruler.
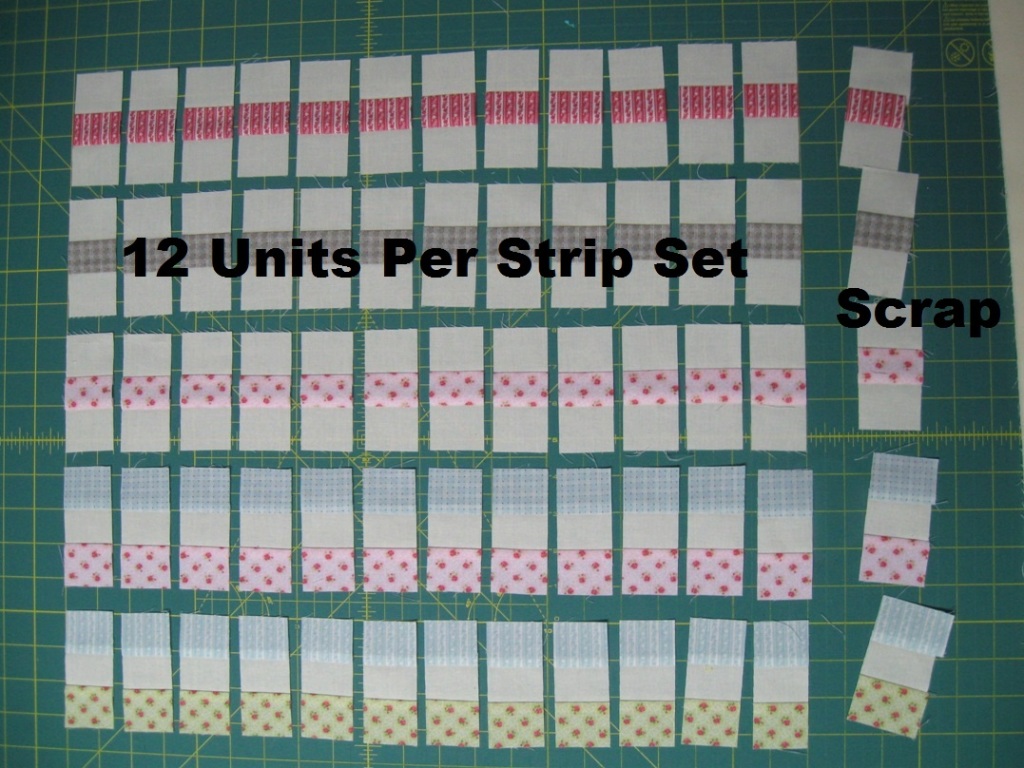
Continue this process, cutting 12 units that measure 1 1/2" x 3½" per each strip set.
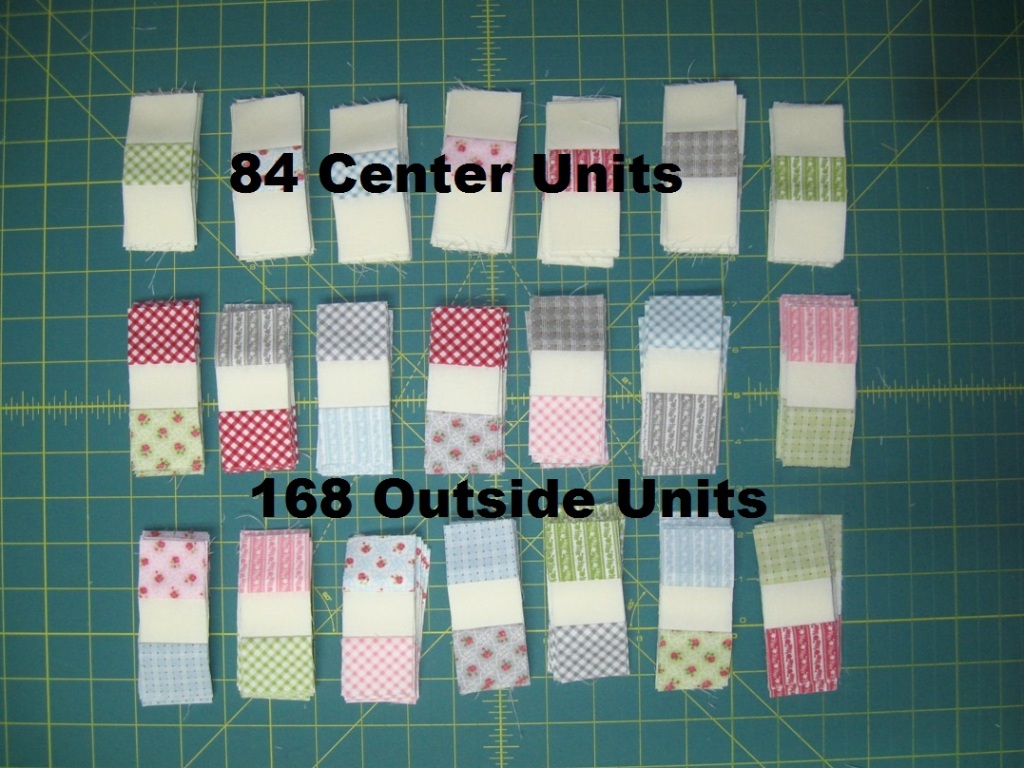
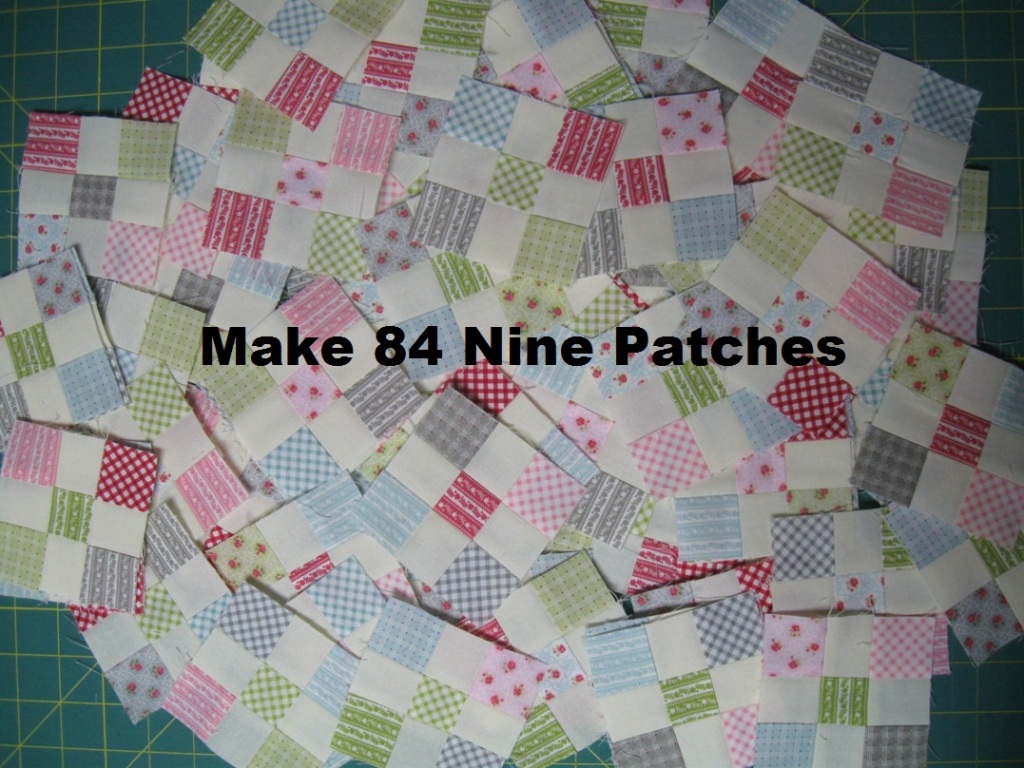
Then repeat this cutting process for all of your strip sets creating a total of (84) Center Units (the print square in the Center) and 168 Outside Units (the 2 print squares along the outside).
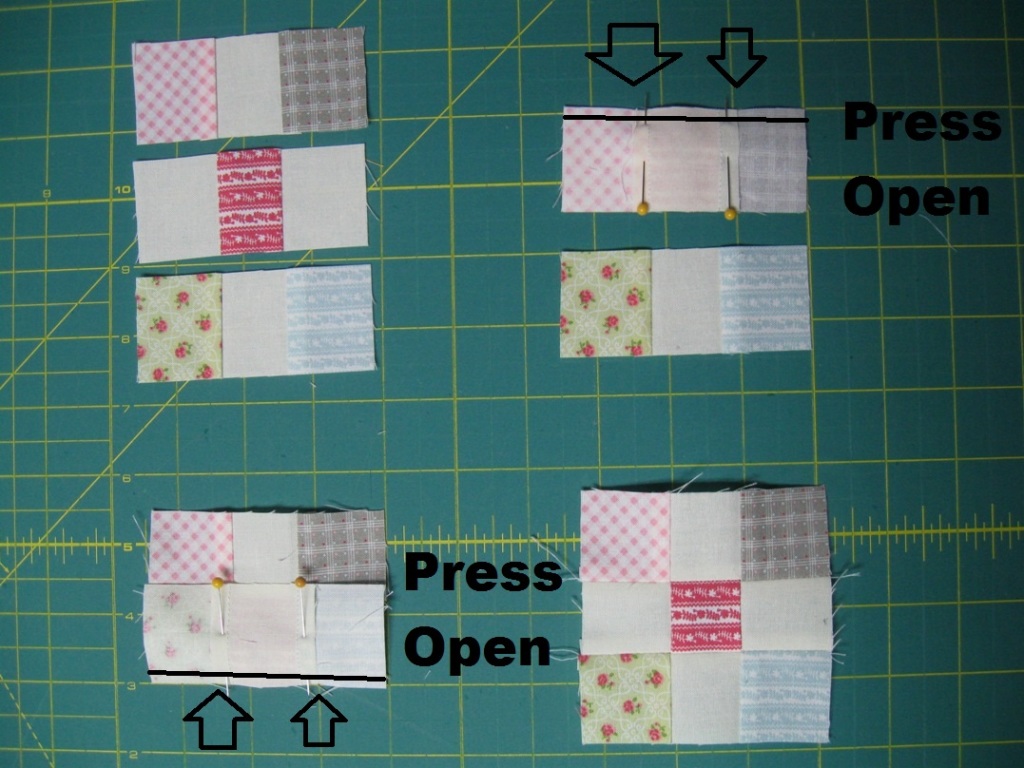
And now, with your units all ready, you can make your Nine Patch Blocks. Place 2 Outside Units and 1 Center Unit as shown below. Place the top row onto the center row with right sides together aligning the seams. You can pin these seams or just nest them as you you sew a 1/4" seam along the edge. Press the seam open. Then place the bottom row onto the center row with right sides together aligning the seams. Once again, pin or nest the seams as you stitch a 1/4" seam along the edge. And again, press the seam open.
Chain Stitch the above step to create a total of 84 Nine Patch Blocks :) Aren't the just so cute and adorable!!! And now you can set the aside.
STEP 3 - STAR BLOCKS
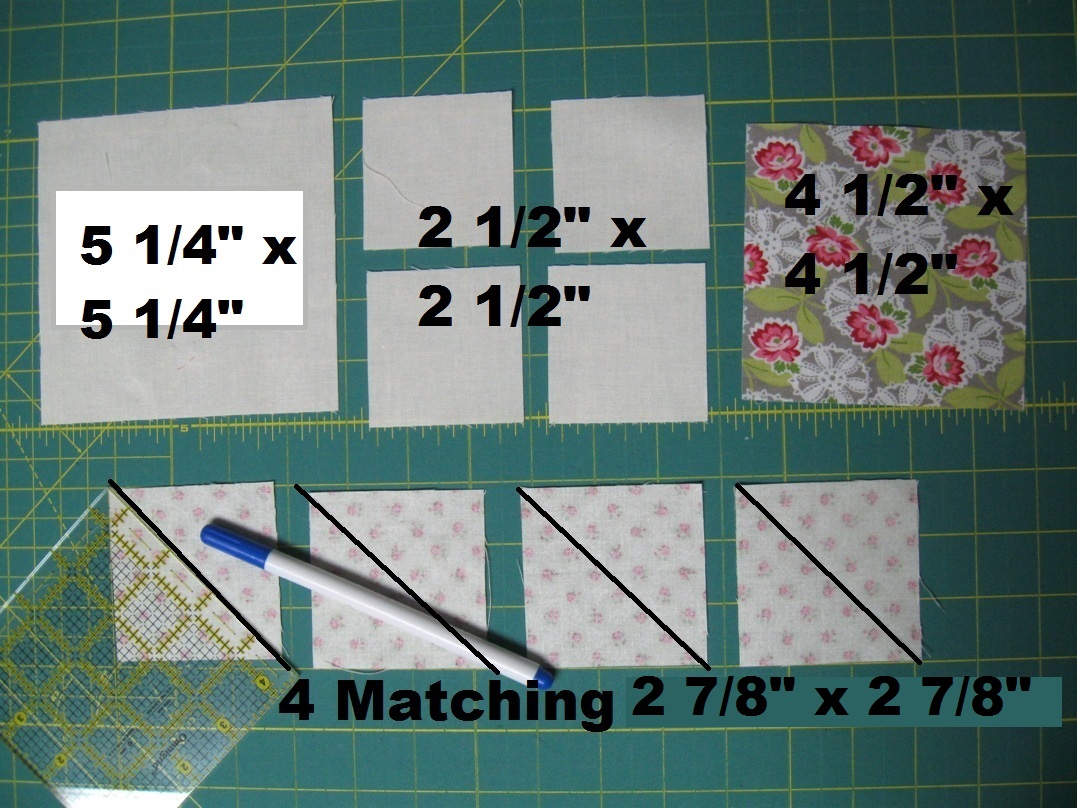
Pull out the pieces marked Star Blocks. You will be making 12 Star Blocks so chain stitch each sub-step 12 times ;) For each Star Block you will need (1) 5 1/4" solid cream square, (1) 2½" solid cream square, (1) 4½" large floral square, and (4) Matching 2 7/8" small tone-on-tone squares. Draw a diagonal line on the wrong side of the (4) Matching 2 7/8" small tone-on-tone squares.
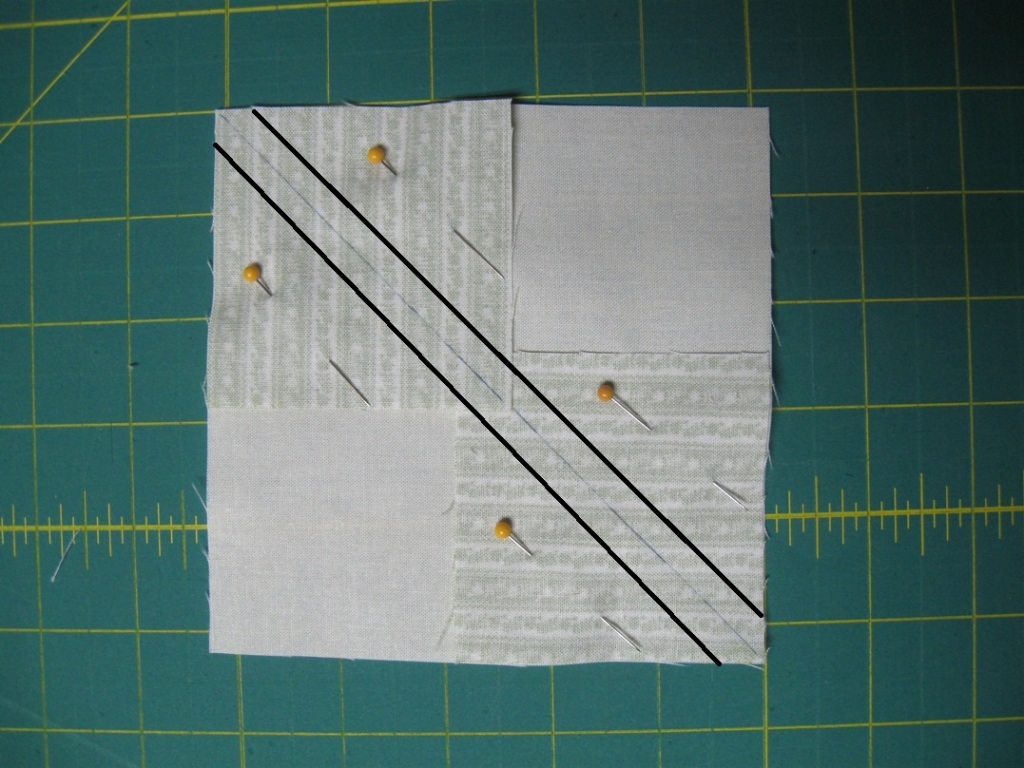
We will start the Star block by making some flying geese and using my favorite "no waste" method. Place 2 marked squares onto the large cream square as shown below with right sides together and pinning the marked squares far enough away from the drawn line to sew along it. Sew a 1/4" seam along either side of the drawn line. You will save time chain stitching all of the sets along the right side and then clipping your threads and stitching all of your sets along the left side.
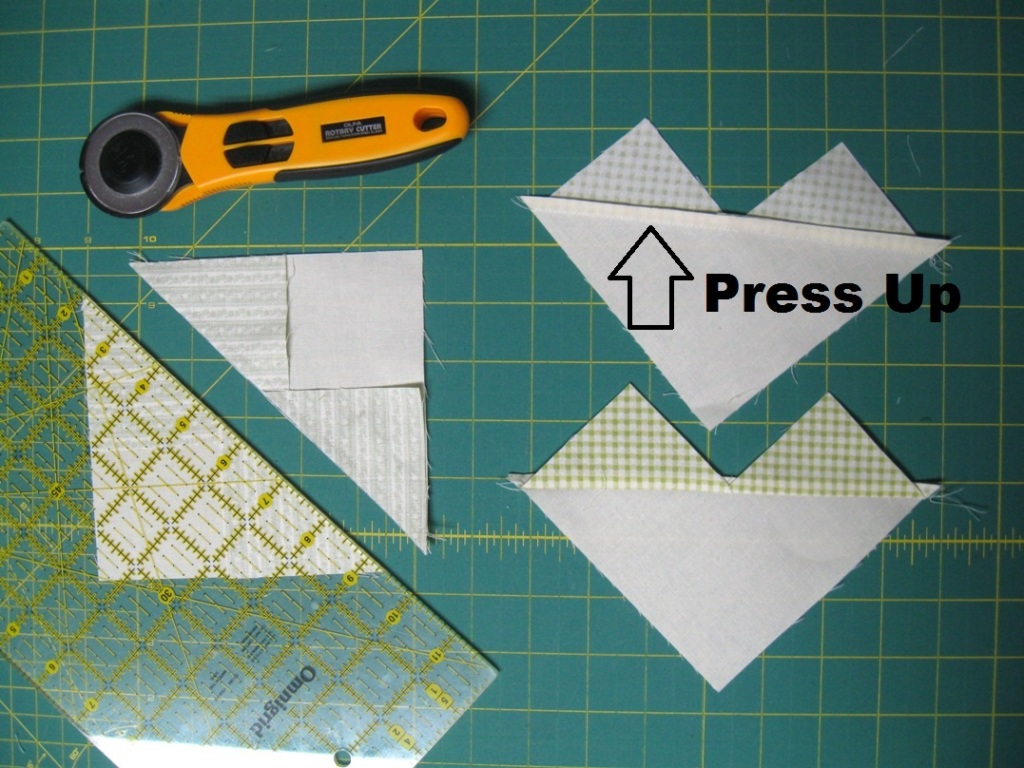
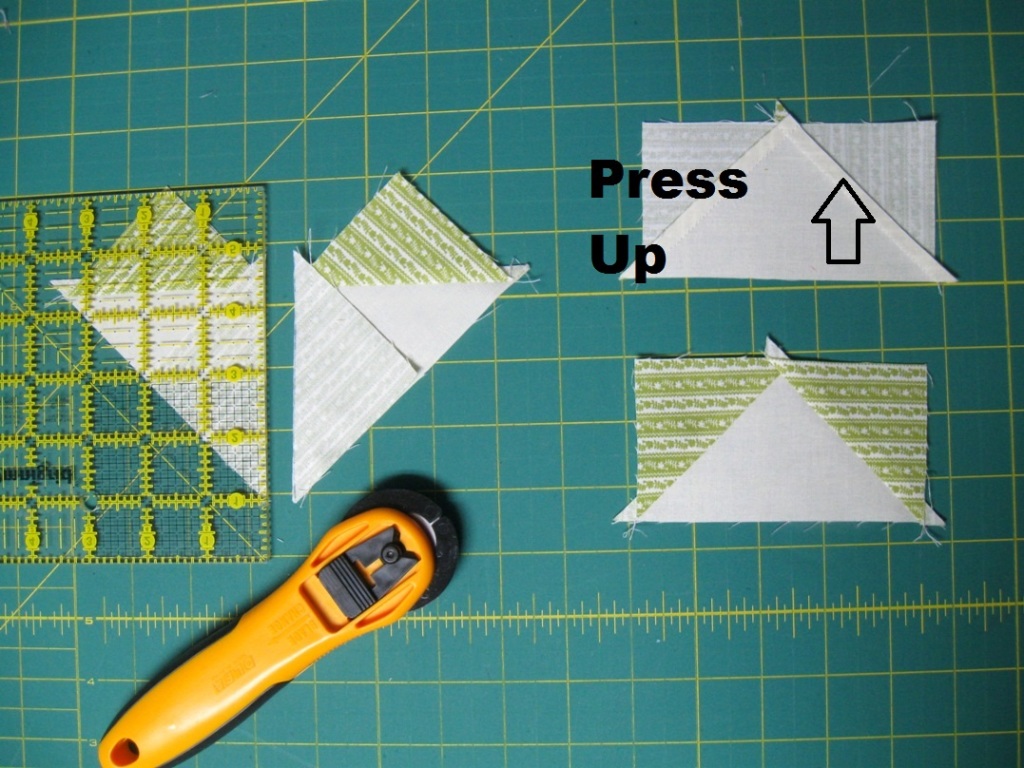
Cut along the drawn line and then press the seam allowance up towards the small tone on tone prints.
Place the remaining 2 matching tone on tone small squares onto the newly pressed units as shown below. Once again, chain stitch a 1/4" seam along either side of the drawn line on both units.
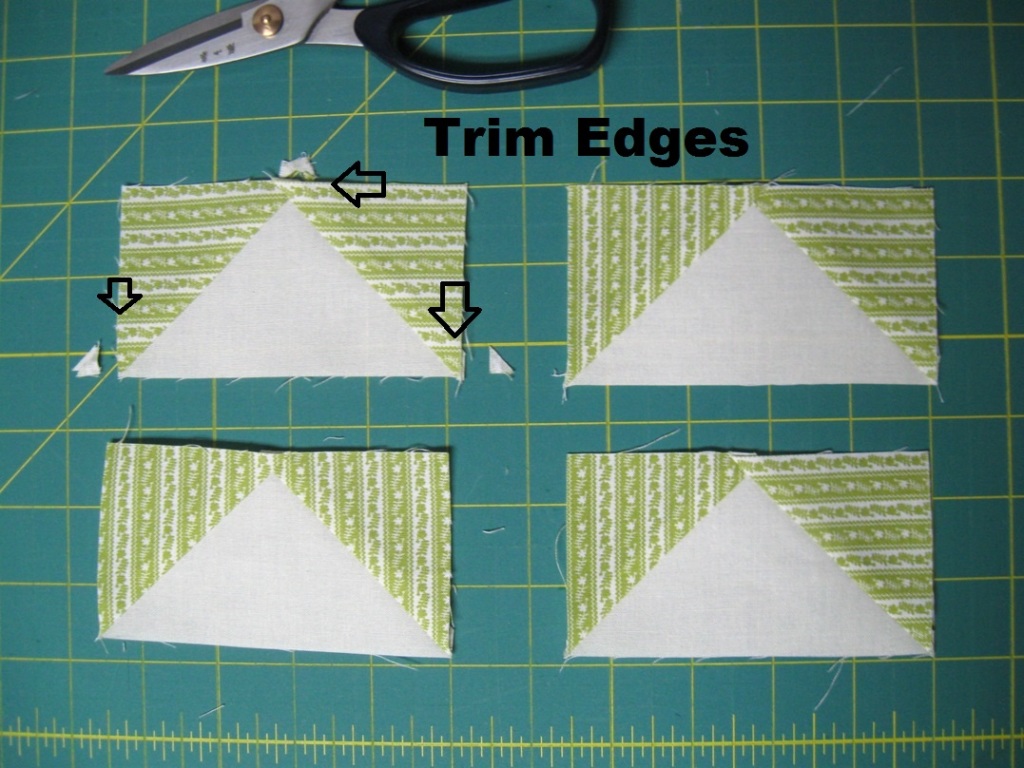
Cut along the drawn line and then press the seam allowance up towards the small tone on tone print once more.
Finally, trim the little bits along the edge of your block and you have 4 flying geese, just like that with no waste ;)
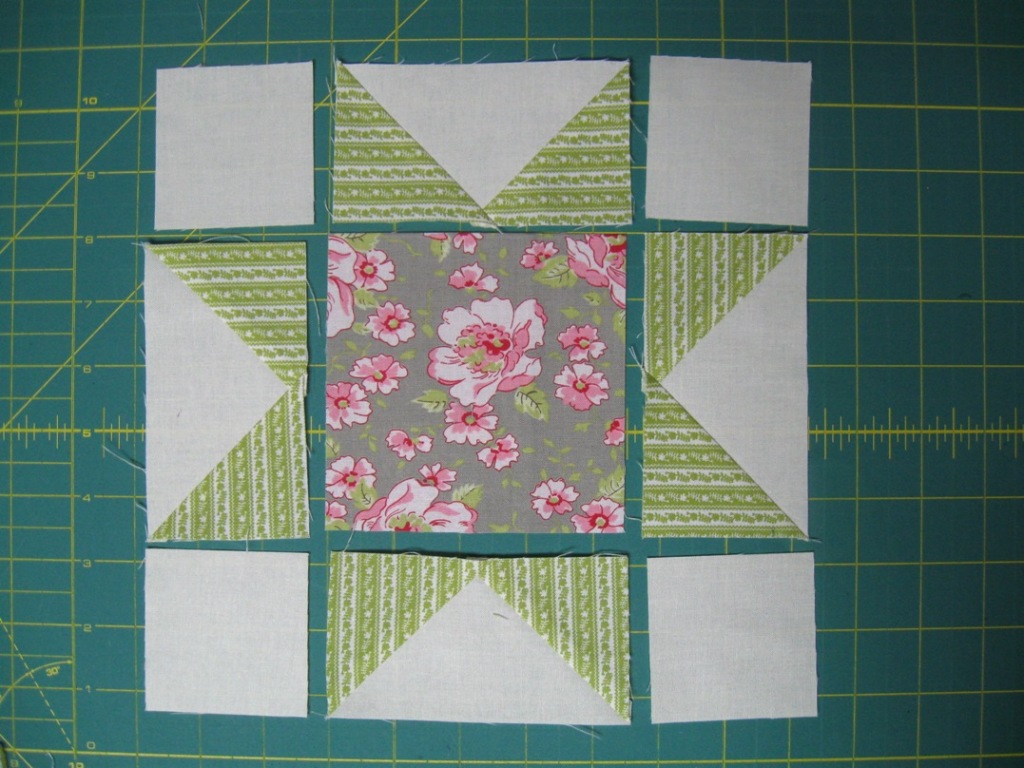
Now lay out your 4 flying geese, 4 small cream solid squares, and 1 large floral print square as shown below to create a star.
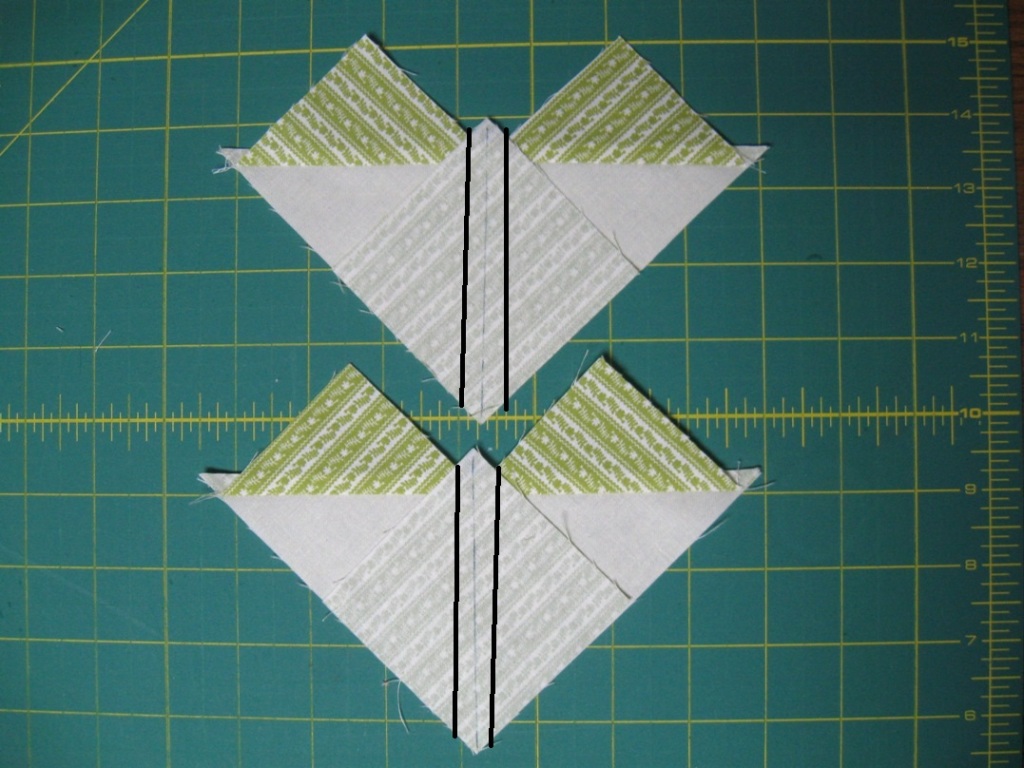
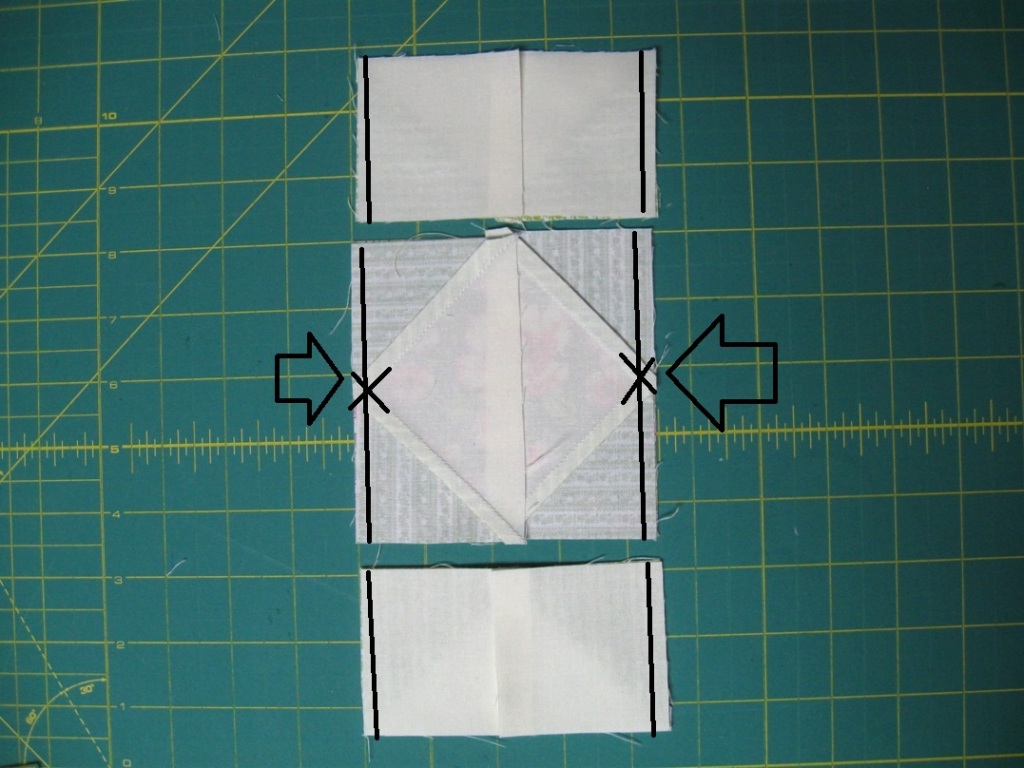
Place the left and right hand side pieces on the center pieces with right sides together. Aligning as you go, stitch a 1/4" seam along each edge. Take care when stitching the center row that your stitching crosses directly over where the thread creates an X in the thread. This will ensure you perfect star points :) Again, I like to chain stitch all of my stars to save time.
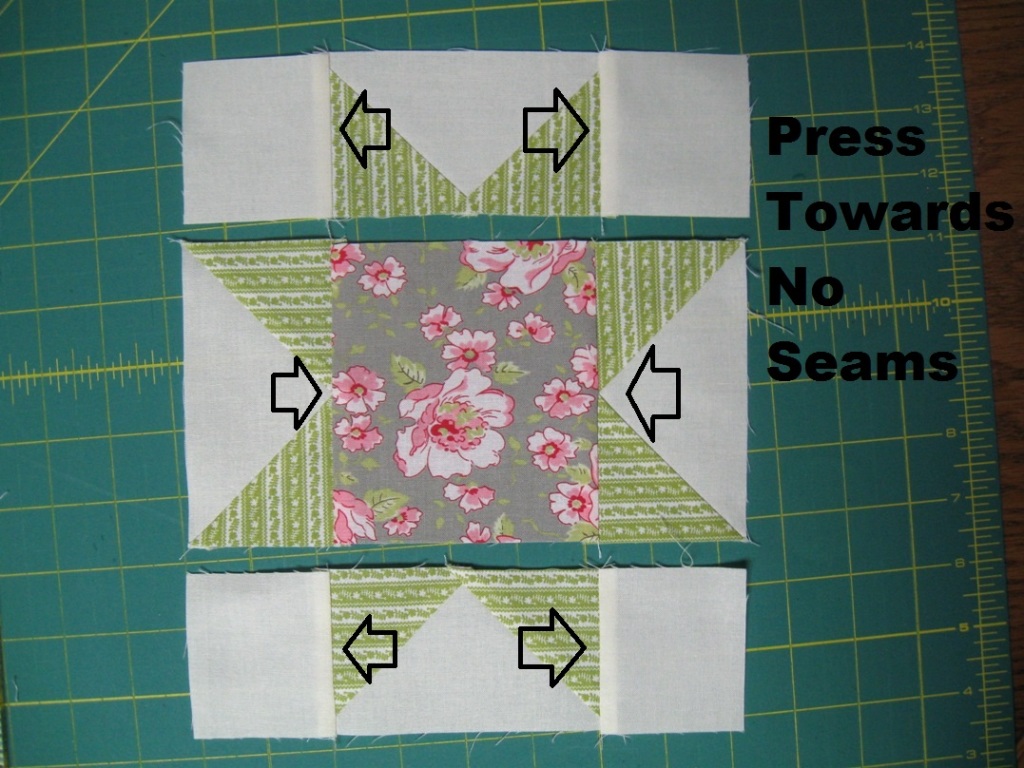
Press the seam allowances in the top and bottom row outwards towards the small cream squares and the seam allowance in the center row inwards towards the large print floral. This way there are no seams and everything will lie nice and flat and nest in the next step.
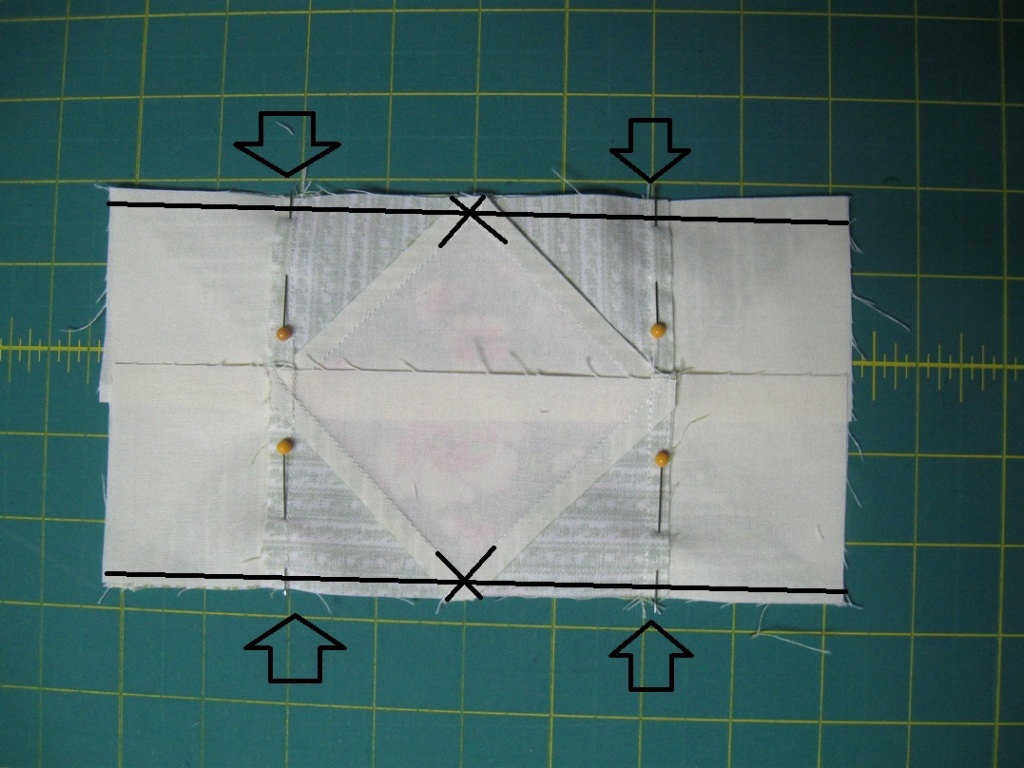
Place to top and bottom row onto the center row with right sides together. Nest and pin the seams. Sew a 1/4" seam along the pinned edge, once again being sure to stitch directly over the center of the thread X, ensuring perfect points. Press the seam allowance open.
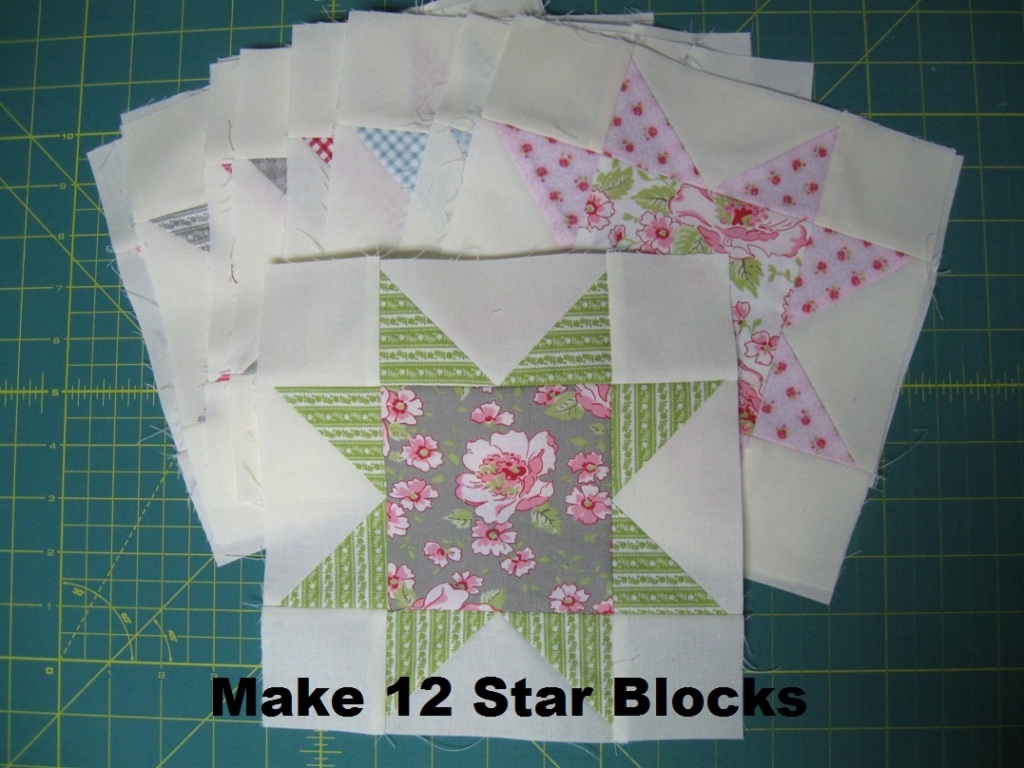
And just like that, you have 12 Beautiful Star Blocks!!! If you decided not to chain stitch, repeat the above step to make 12 Star Blocks ;)
STEP 4 - HEART BLOCKS
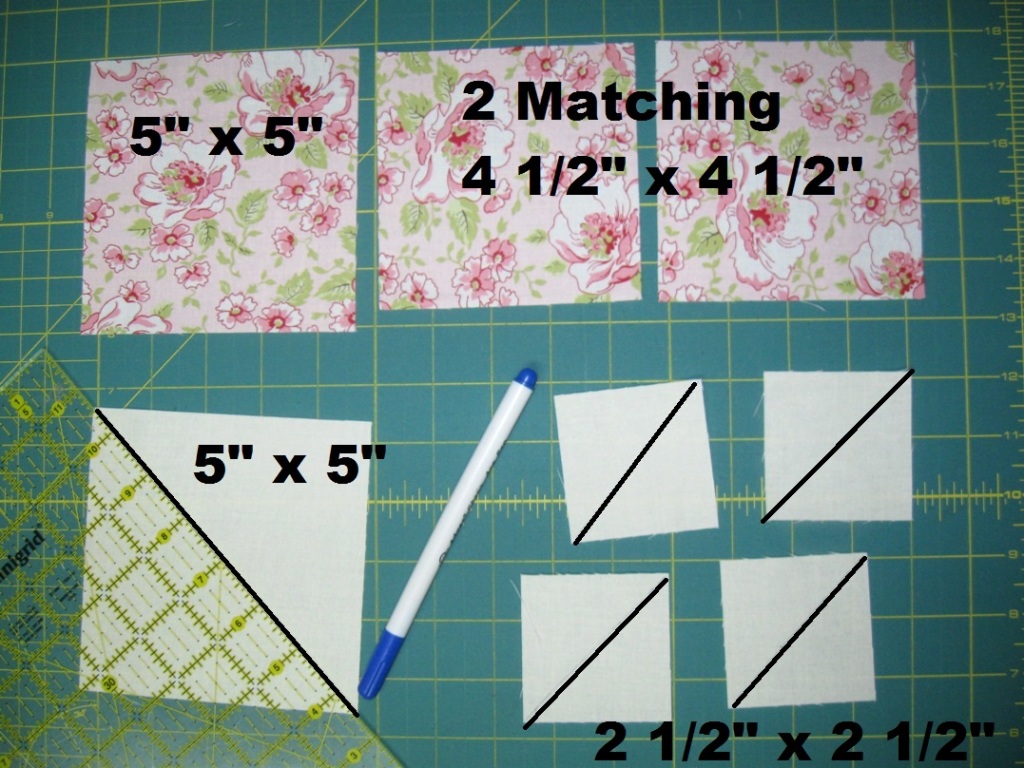
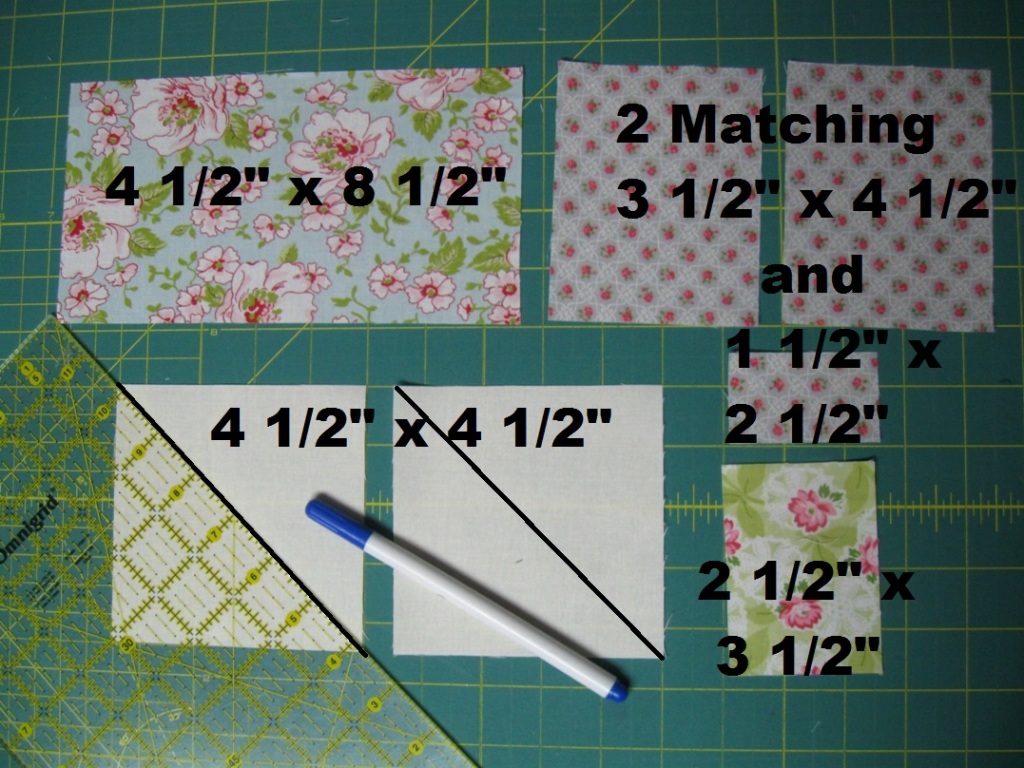
Pull out the pieces marked Heart Blocks. You will be making 12 Heart Blocks so chain stitch each sub-step 12 times ;) For each heart Block you will need (1) 5" x 5" solid cream square, (4) 2½" solid cream squares, and Matching (1) 5" x 5" large floral square, and (2) 4½" large floral squares. Draw a diagonal line on the wrong side of all of the solid cream squares.
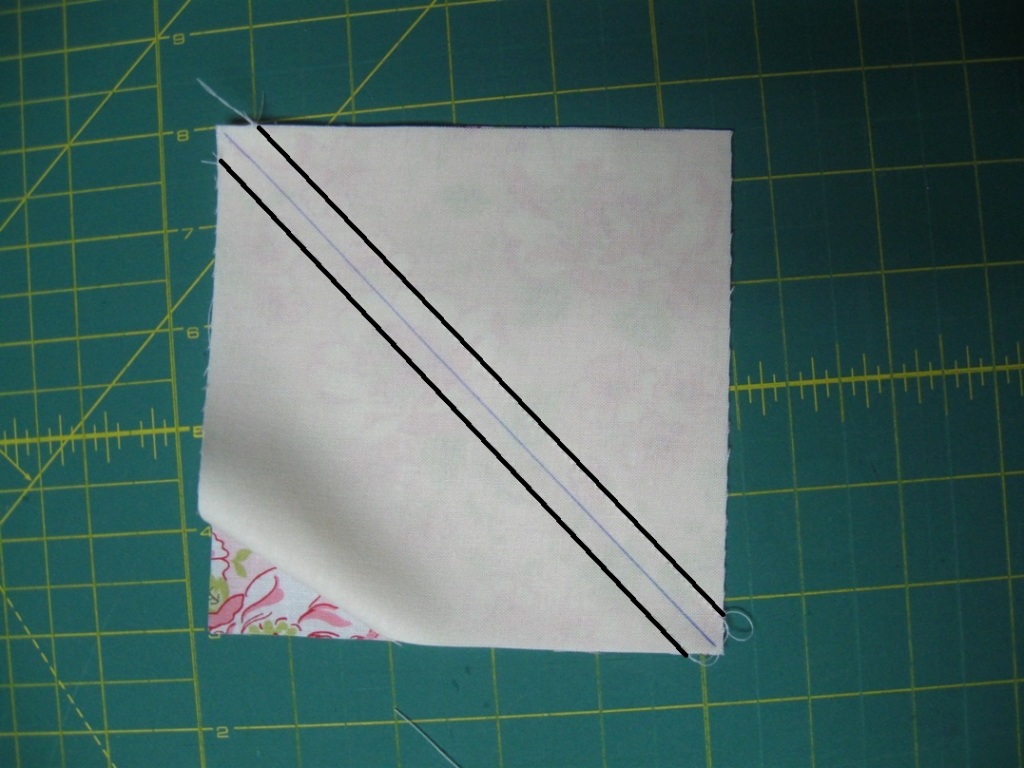
And we will start the Heart Block out with a Half Square Triangle. Place a 5" x 5" solid cream square and a 5" x 5" large floral square with right sides together as shown below. Stitch a 1/4" seam along either side of the drawn line. Just like before, it will save time to chain stitch all of the seams on the left, the clip your threads and sew all of the seams on the right.
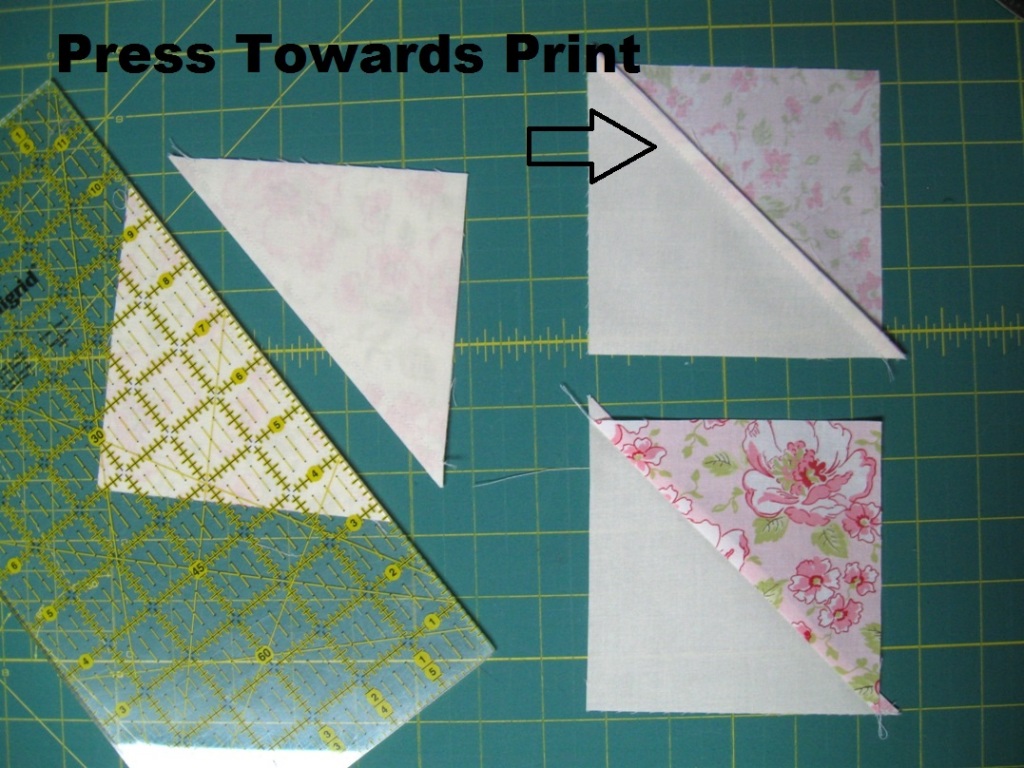
Cut along the drawn line and press the seam allowance towards the floral print side of the half square triangle.
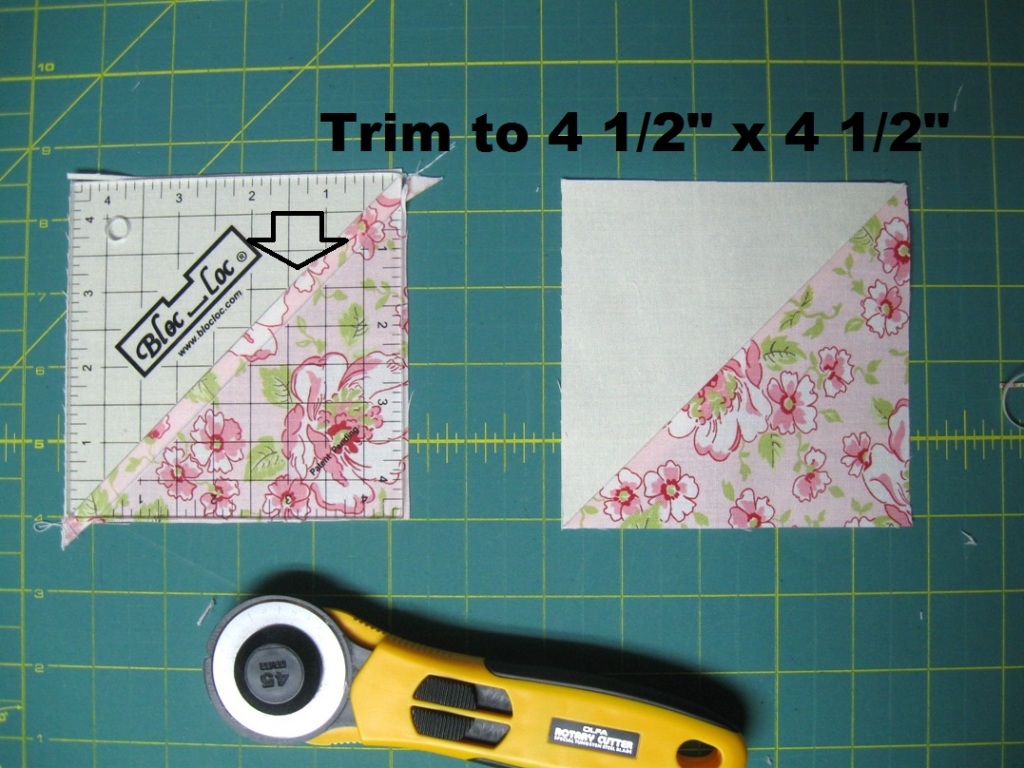
Using the diagonal line on a square ruler, align the seam of the Half Square Triangle with the diagonal line on your ruler and trim the Half Square Triangle to 4½". If you are new to this process you can see a more detailed tutorial on trimming Half Square Triangles here. Now set your trimmed Half Square Triangles aside for the moment.
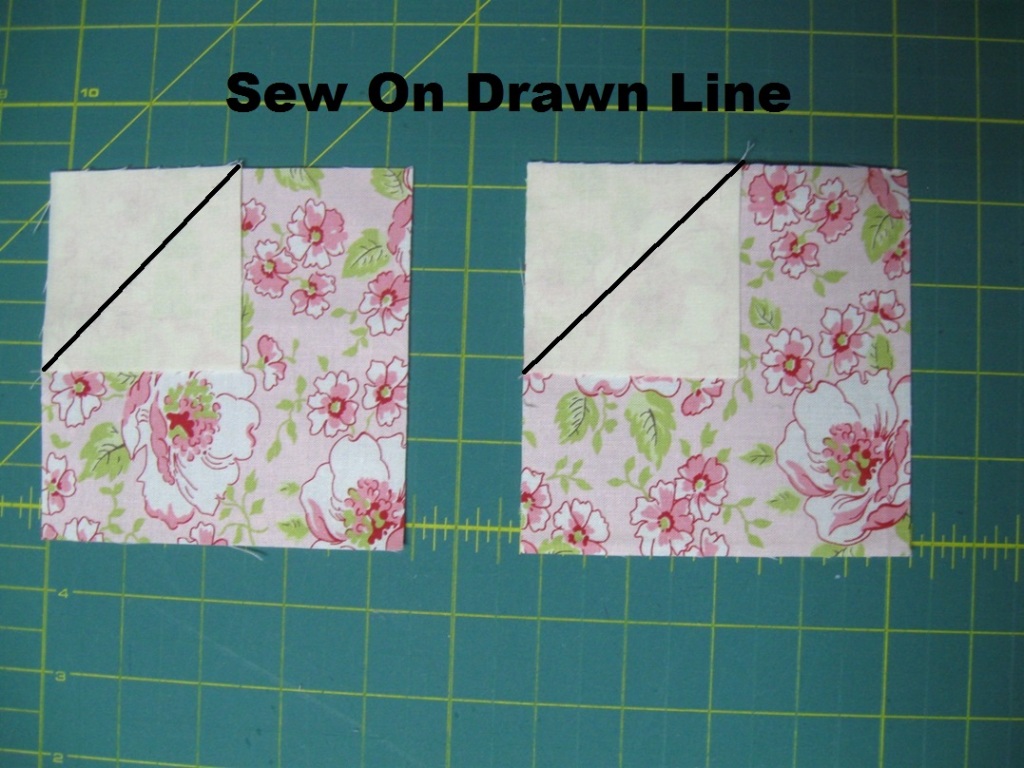
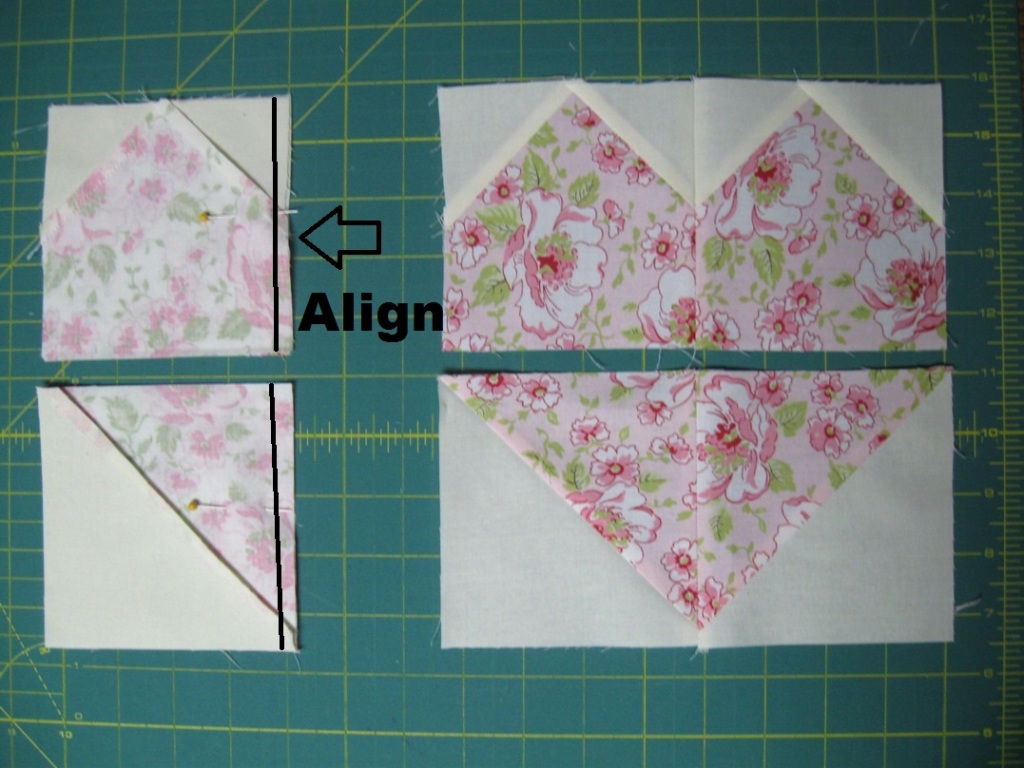
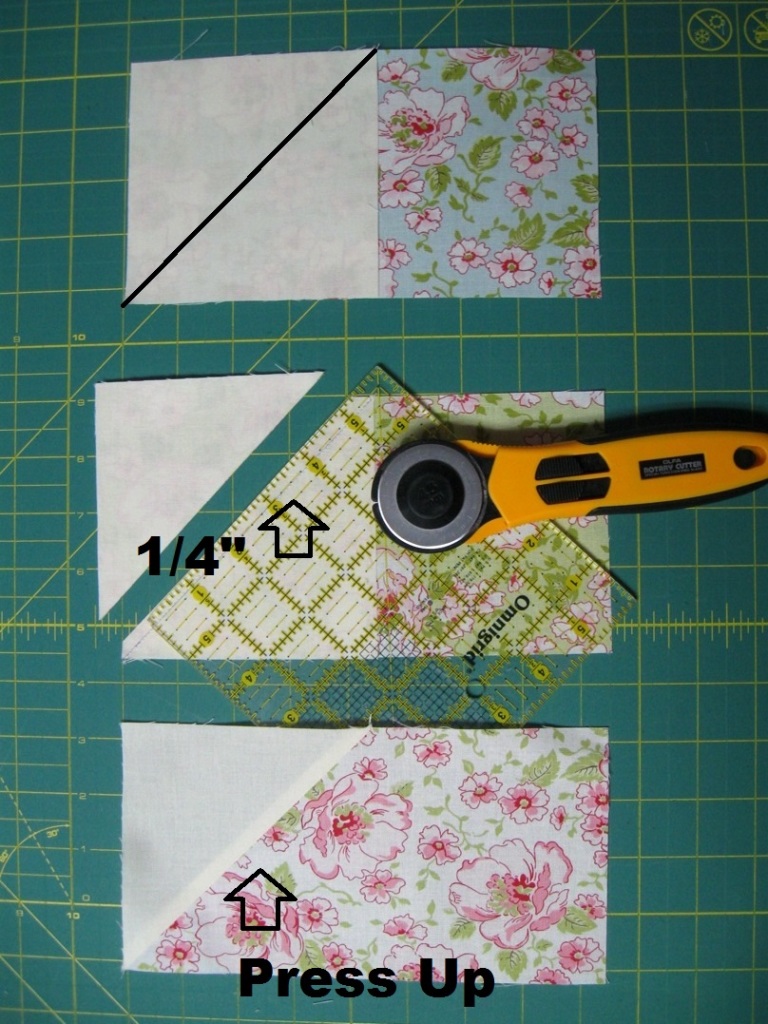
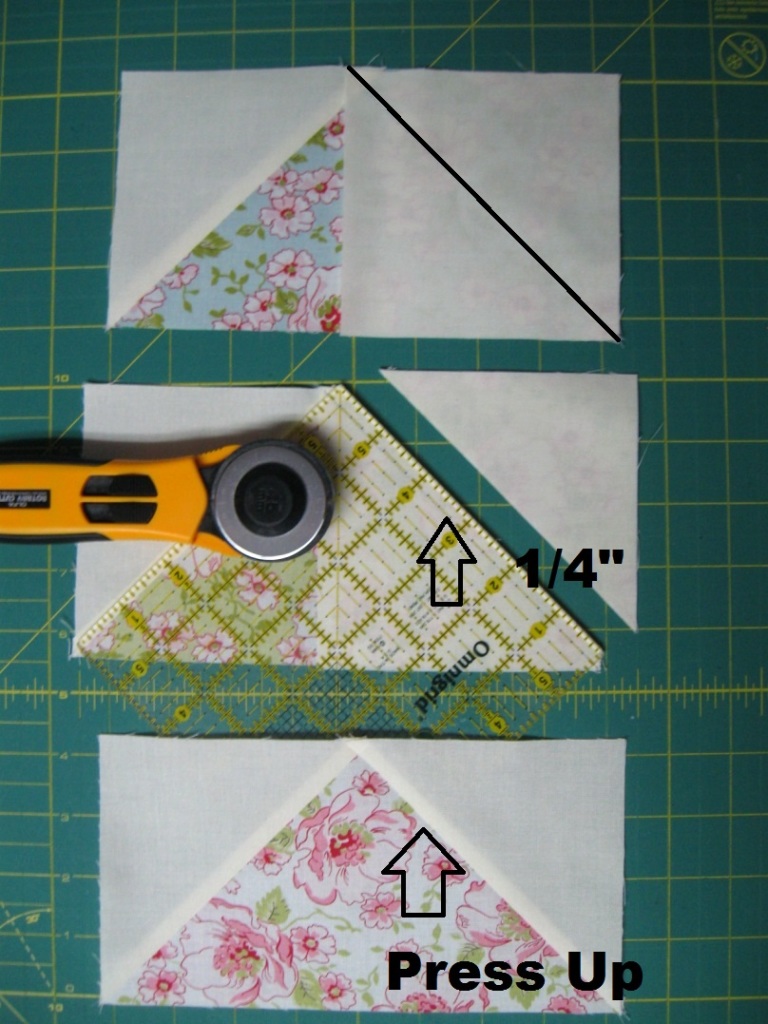
And now, you are ready to move onto some Goose in the Corners. Place two small cream squares in the corners of the matching 4½" large floral squares as shown below. Stitch directly on the drawn line from corner to corner, edge to edge of both squares.
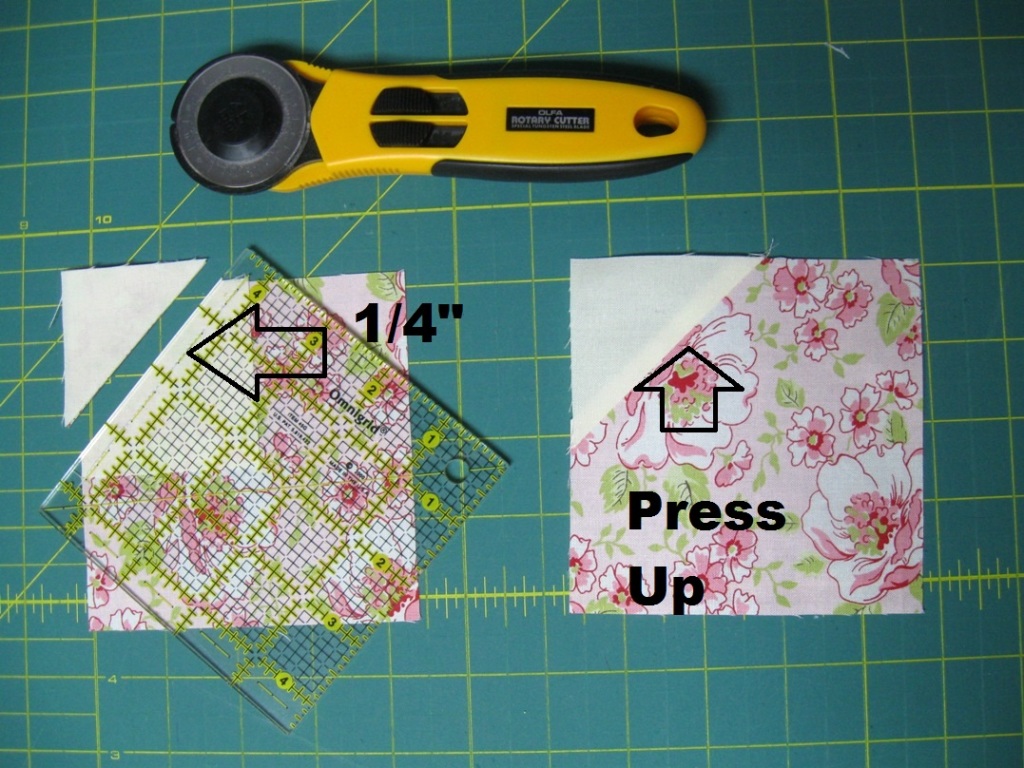
Using your ruler, measure 1/4" over the sewn line. Cut along the edge of the ruler to create your seam allowance. Press the seam allowance up towards the cream solid.
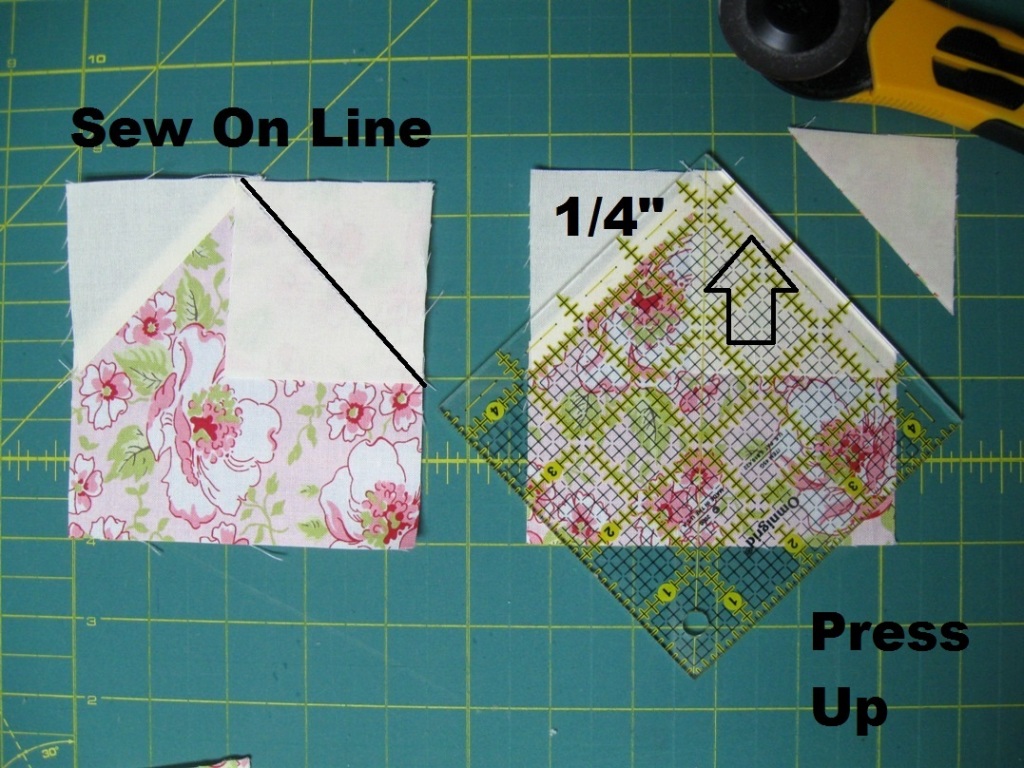
Now, repeat for the other side. Once again, place a marked cream square onto the other side of the floral 4½" square with right sides together and stitch directly along the drawn line from edge to edge. Measure 1/4" over the stitched line and cut along the edge of the ruler creating a seam allowance that you then press up towards the cream solid. Be sure to do this for both squares :)
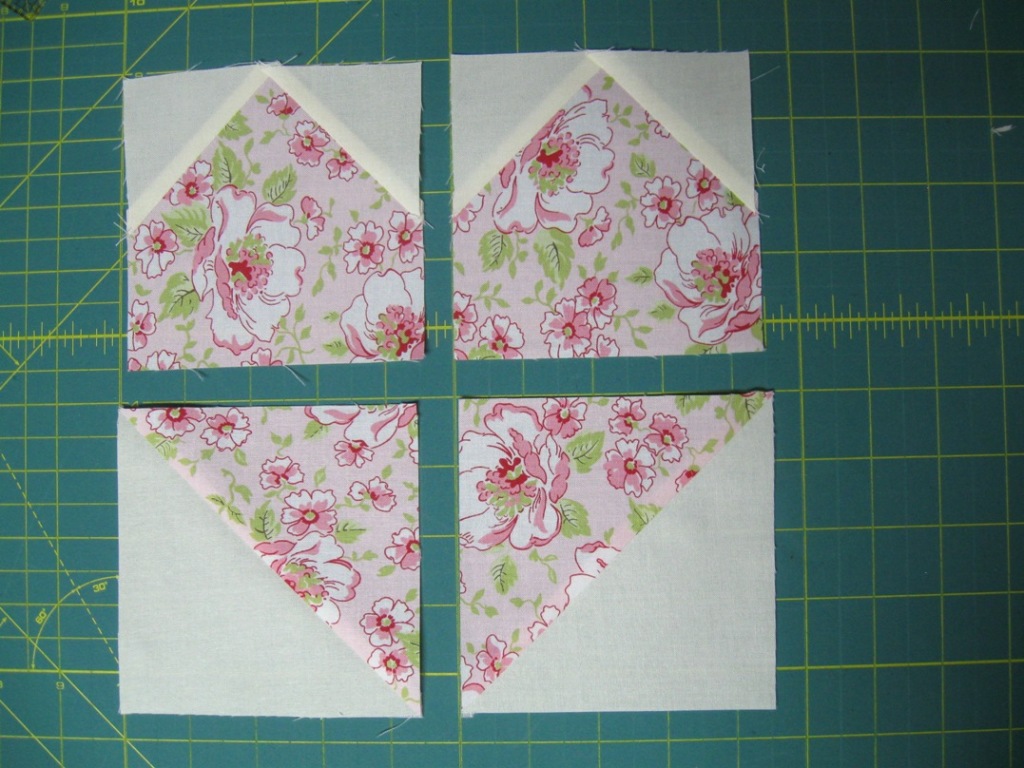
Now grab your Matcing Goose units and your Matching Half Square Triangle units and lay them out as shown below to create a heart.
Place the right hand side blocks onto the left hand side blocks with right sides together. Align and pin the seams in place. Stitch a 1/4" seam along the edge and press the seams open to create 2 rows.
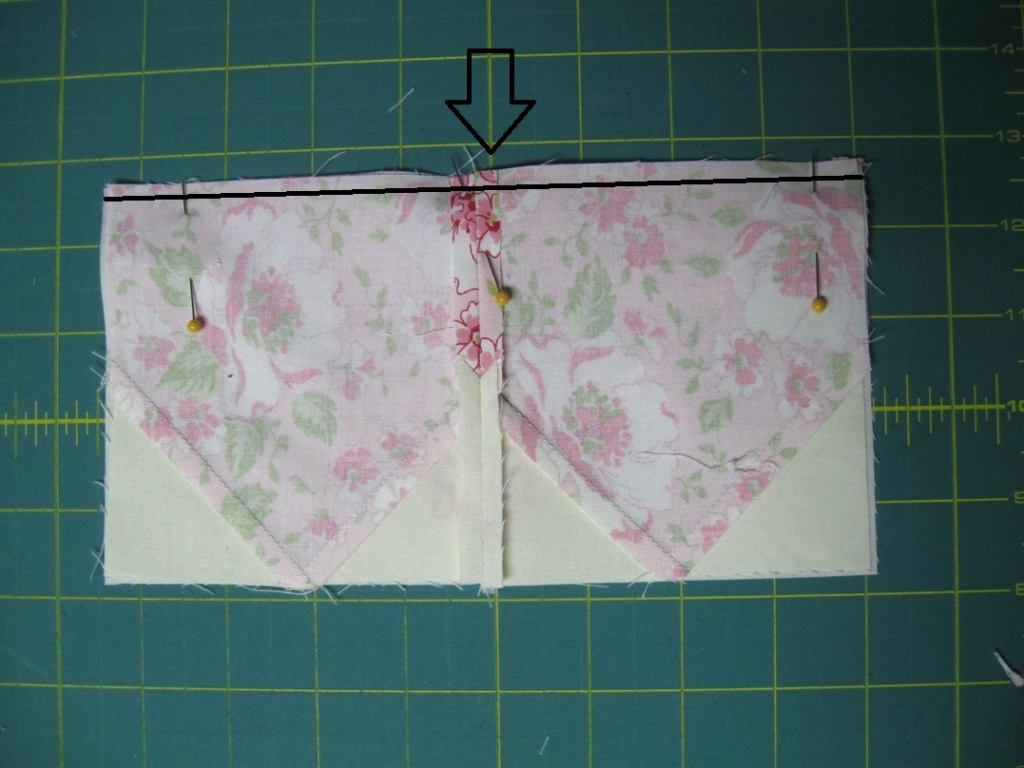
Now simply place the top row onto the bottom row with right sides together. Align and pin the center seam and stitch a 1/4" seam along the pinned edge. Press the seam allowance open.
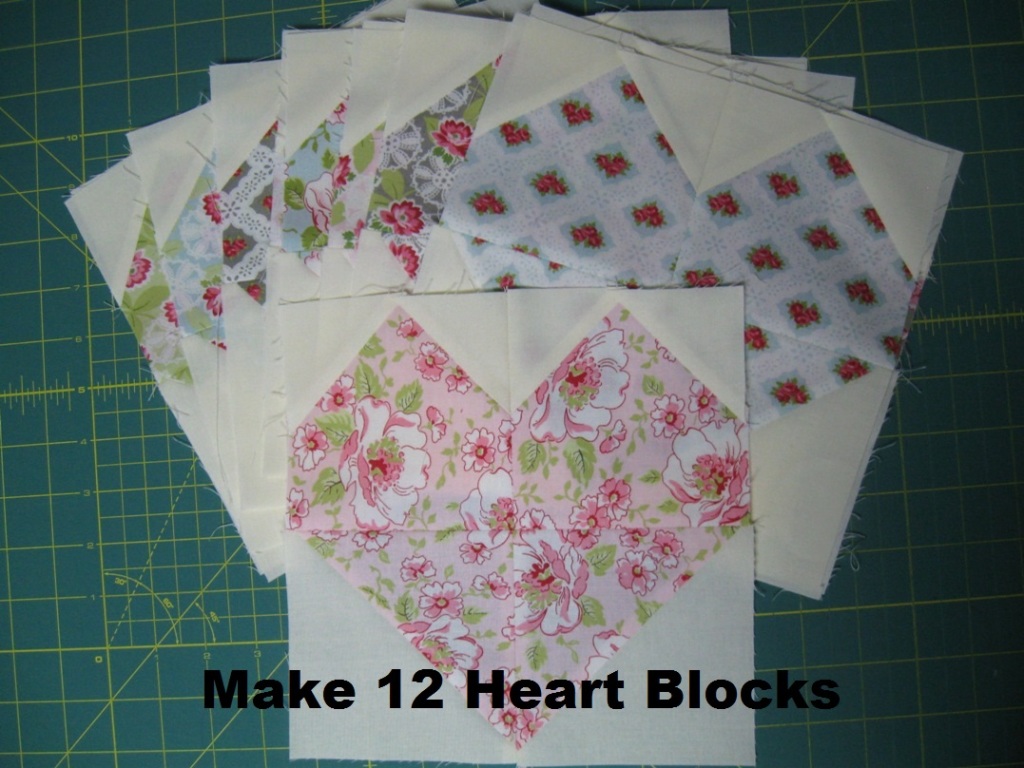
And just like that, you have 12 Beautiful Heart Blocks!!! If you decided not to chain stitch, repeat the above step to make 12 Heart Blocks ;)
STEP 5 - HOUSE BLOCKS
Pull out the pieces marked House Blocks. You will be making 6 House Blocks so chain stitch each sub-step 6 times ;) For each House Block you will need (1) 4½" x 8½" large floral rectangle, (2) 4½" solid cream squares, (1) 2½" x 3½" large floral rectangle, and Matching (2) 3½" x 4½" small tone-on-tone rectangles and (1) 1½" x 2½" small tone-on-tone rectangle. Draw a diagonal line on the wrong side of the (2) 4½" solid cream squares.
And we will start the House Block with using the Stitch and Flip method. Place a Marked Creme square onto a 4½" x 8½" Large Floral Rectangle as shown below. Stitch directly on the drawn line from corner to corner. Using your ruler, measure 1/4" over the stitched line and cut along the edge of the ruler. Press the seam allowance up towards the cream solid.
Now repeat this for the other side. Once again, Place a Marked Creme square onto the other side of the 4½" x 8½" Large Floral Rectangle as shown below. Stitch directly on the drawn line from corner to corner. Using your ruler, measure 1/4" over the stitched line and cut along the edge of the ruler. Press the seam allowance up towards the cream solid. And just like that, you have a roof. Did you remember to chain stitch them?? Set this aside for the moment.
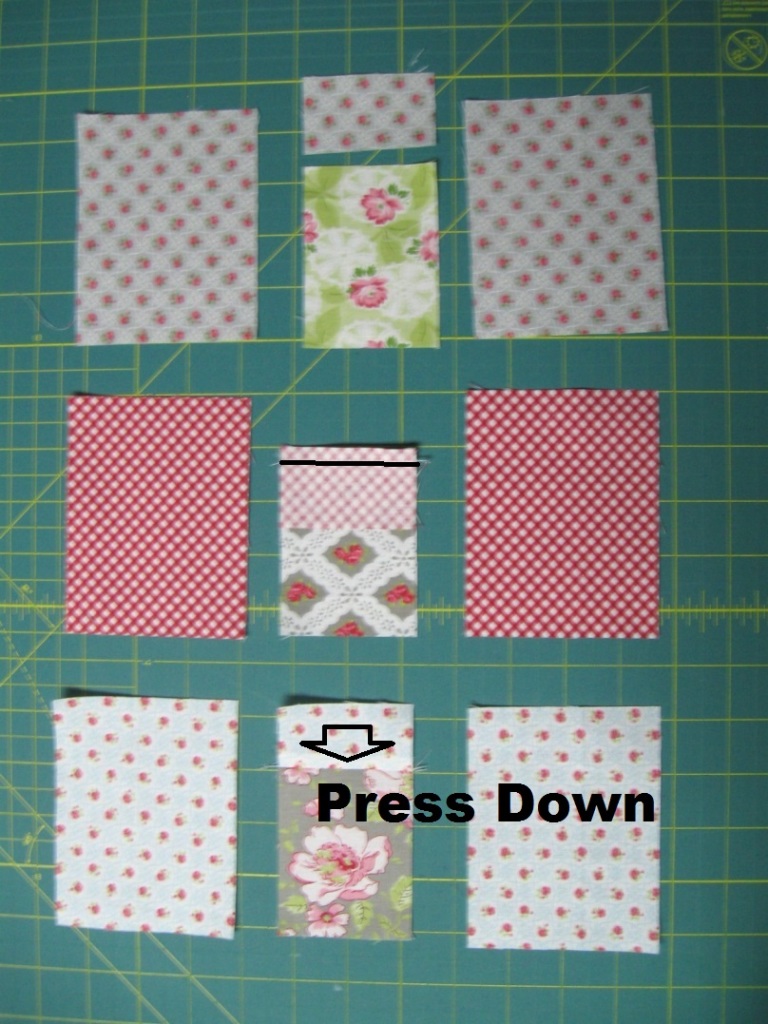
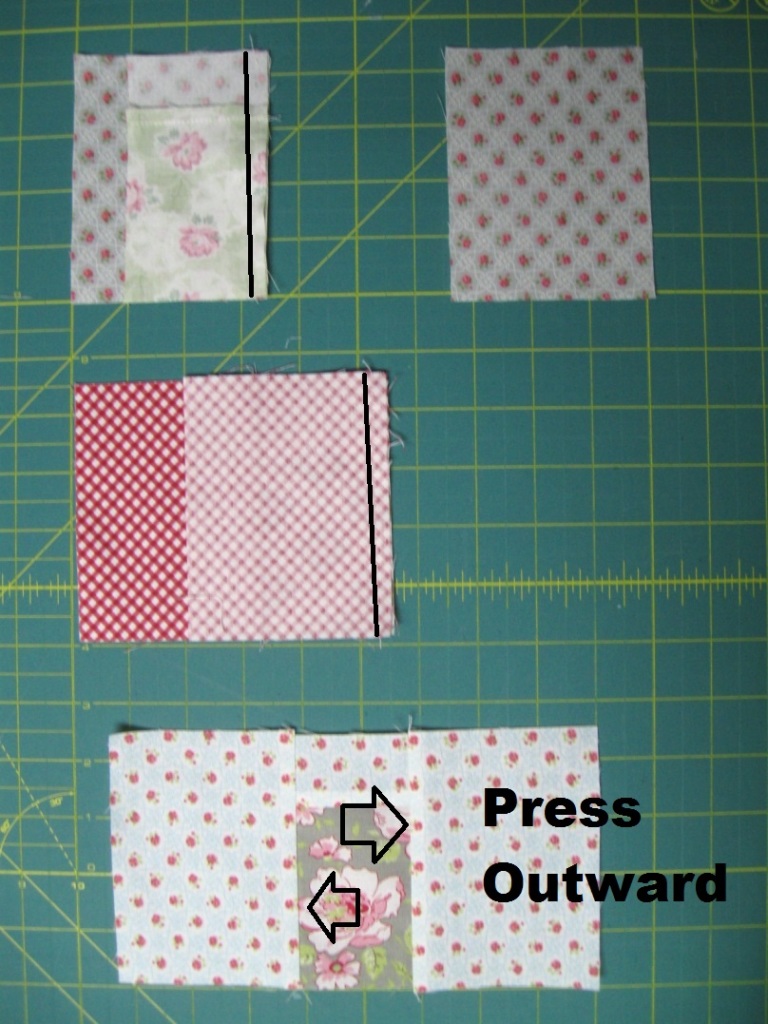
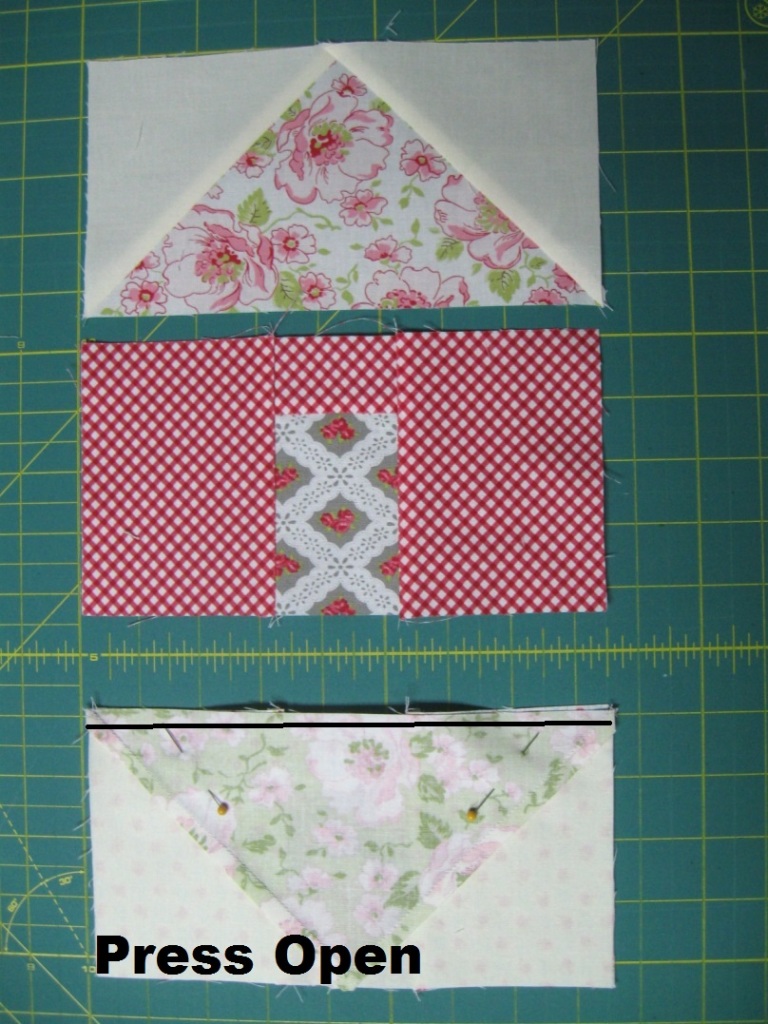
Now to make the house :) Layout your 3 Matching small tone on tone pieces and your 2½" x 3½" Large Floral Rectangle as shown below. Place the 1½" x 2½" small tone on tone rectangle onto the Large Floral rectangle with right sides together. Stitch a 1/4" seam along the edge. Press the seam allowance to one side.
Now you have 3 columns. Place the center column onto the left hand side column with right sides together. Stitch a 1/4" seam along the edge aligning as you go. Then place the right hand side column onto the center column with right sides together. Stitch a 1/4" seam along the edge aligning as you go. Press the seam allowances outwards. And now you have some houses, time to put them together ;)
Place a room unit onto a house unit with right sides together. Align and pin the edge. Sew a 1/4" seam along the pinned edge. Press the seam allowance open.
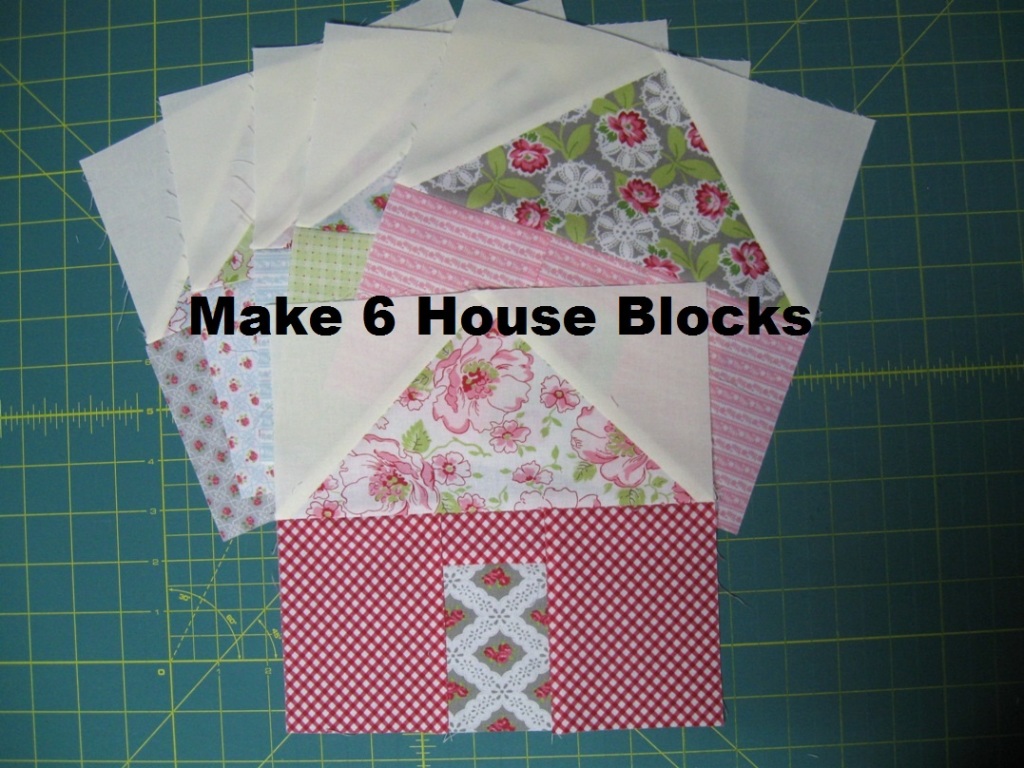
And just like that, you have 6 Beautiful House Blocks!!! If you decided not to chain stitch, repeat the above step to make 6 House Blocks ;)
STEP 6 - MAKING ROWS
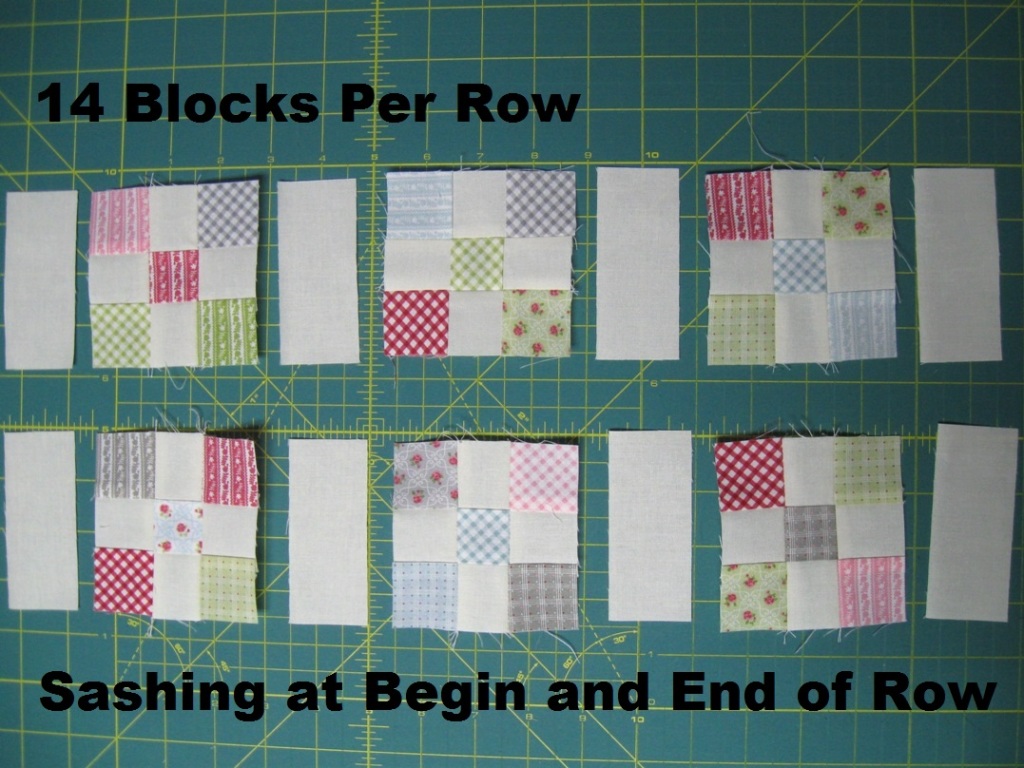
And now with all of your blocks made, you are ready to start making the rows in your quilt. We wills start with the cute little Nine Patch Rows. We will be making 6 of these rows and once again, chain stitching will save you time. Layout, 14 Nine Patch Blocks and place a 1½" x 3½" sashing rectangle at the beginning and end of each row and between each block in the row.
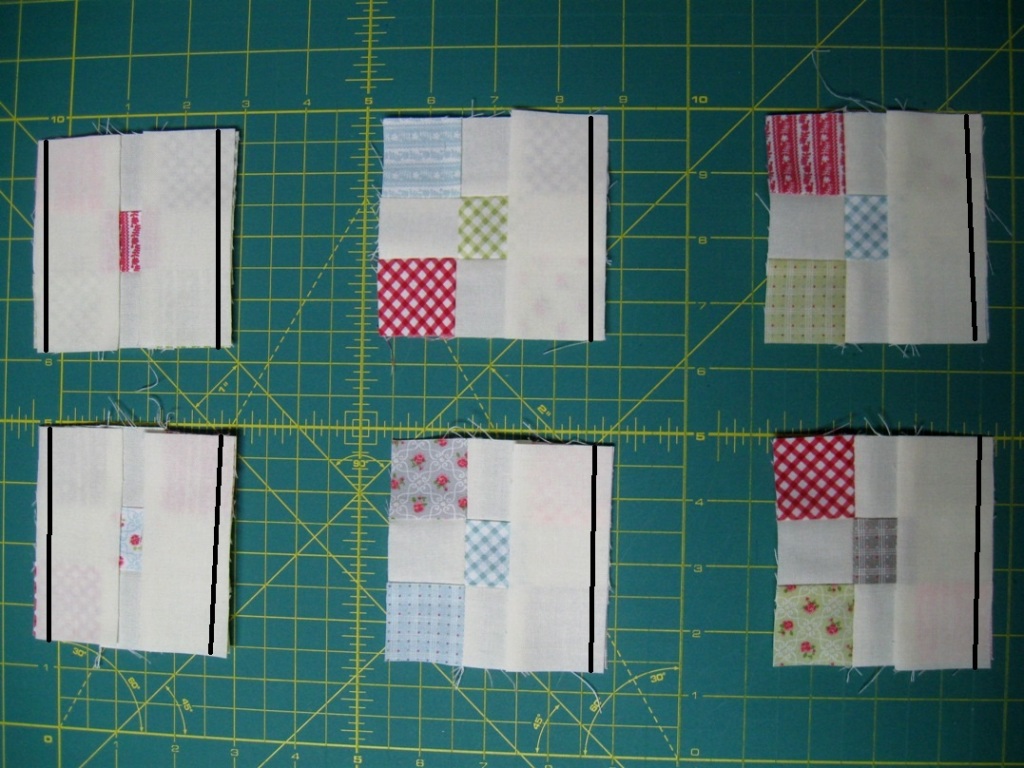
Place the sashing units onto the 9 patches with right sides together. Stitch a 1/4" seam along the edge. Your first block in the row you will be sewing a seam on either side of the block. (if you are not particular about the layout of your rows you can start by simply chain stitching a sashing to ever block and then adding a second sashing to 6 blocks.)
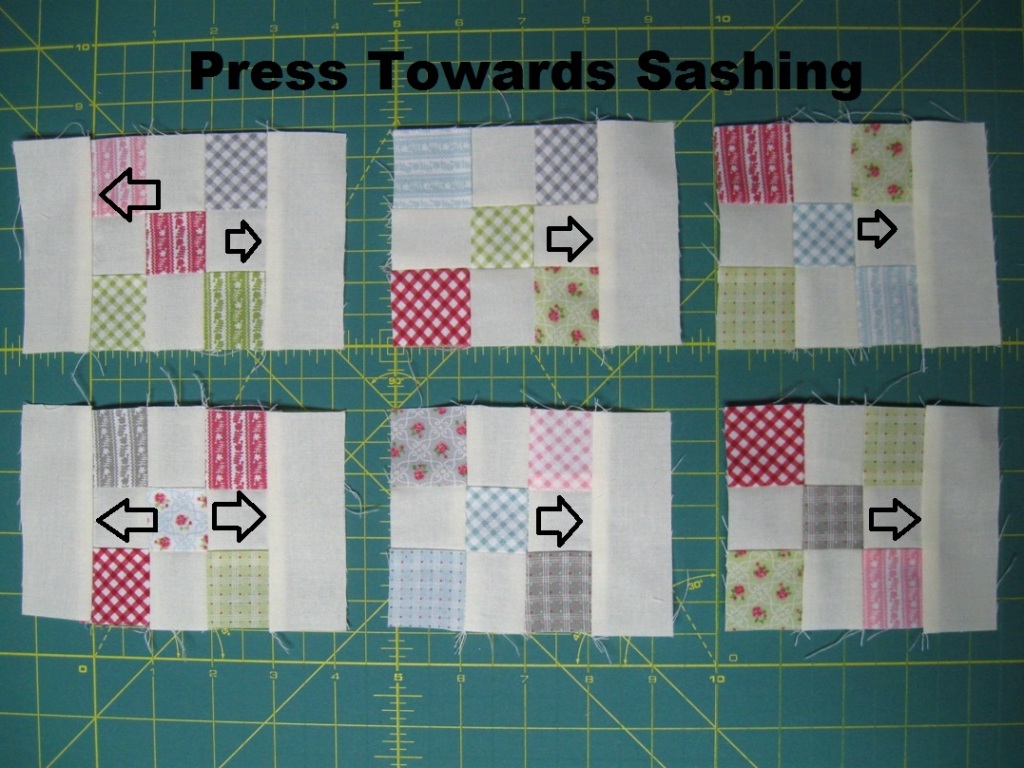
Press the seam allowances towards the sashing.
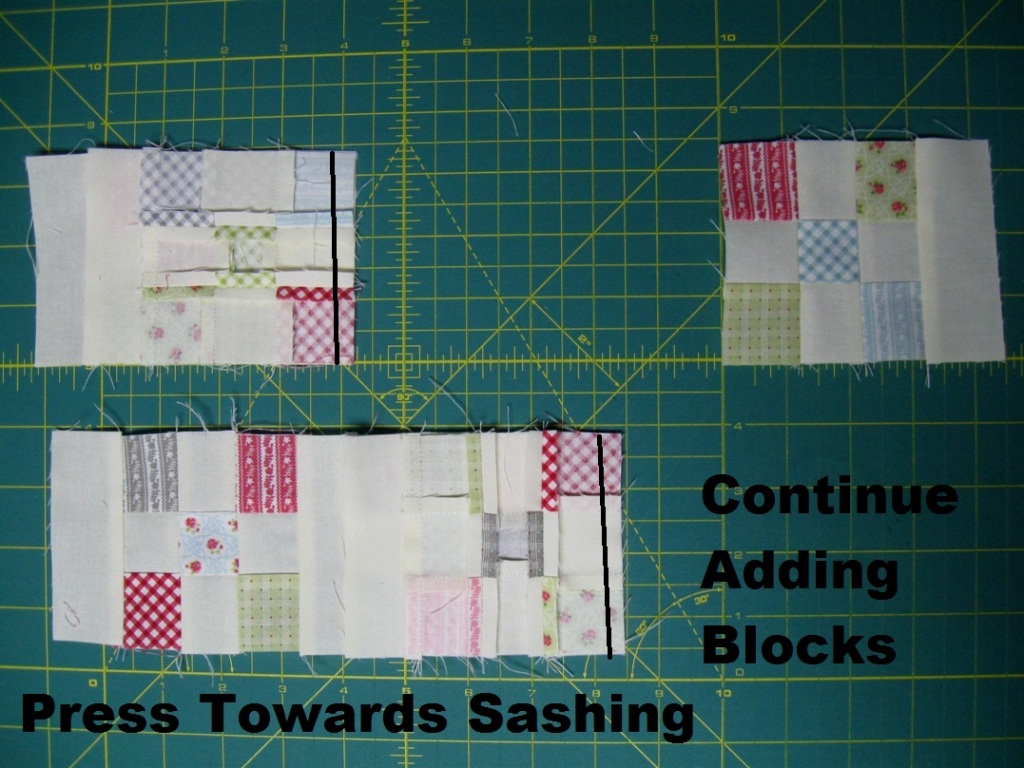
Now, it's time to start sewing up the rows. I like to just add one block at a time and stitch these in chain stitched units of 6. Place the second sashed block onto the first sashed block with right sides together. Aligning as you go, stitch a 1/4" seam along the edge. Then, place the third sashed block onto the now sewn together first and second sashed blocks with right sides together. Stitch a 1/4" seam along the edge. Continue in this fashion until you have added all 14 blocks in the row. Press the seam allowances towards the sashing.
And your 6 adorable Nine Patch Rows are complete. If you decided not to chain stitch, repeat the above process to make 6 rows total.
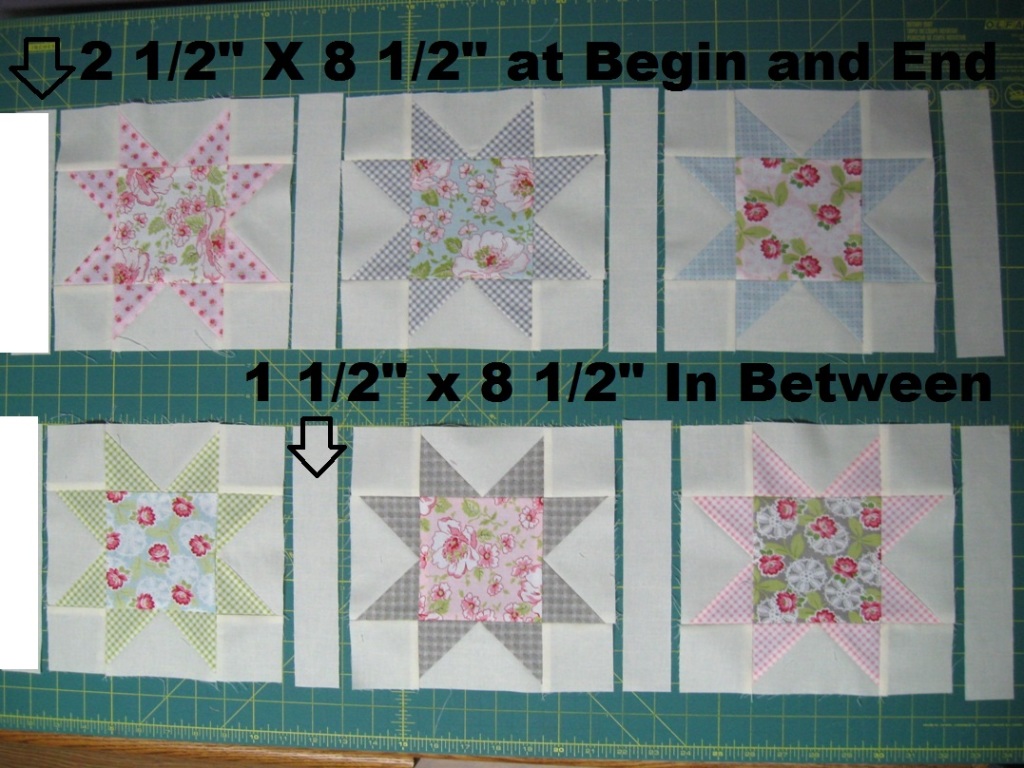
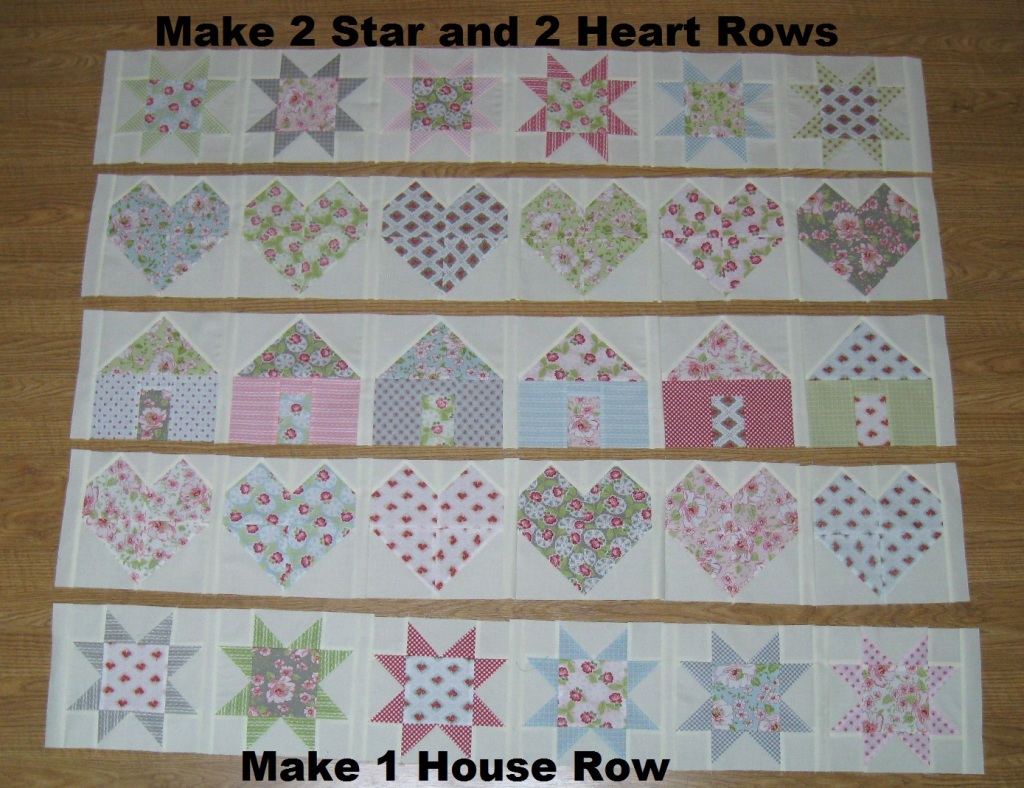
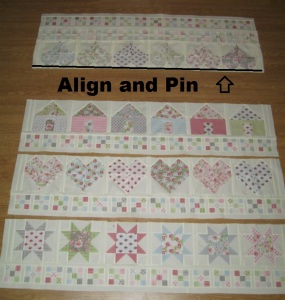
And now you are ready to put your other rows together. These are just like making the Nine Patch Block rows only there are only 6 blocks in a row and you will be making 2 Star Rows, 2 Heart Rows, and 1 House row . Again, chain stitching wills ave you time. Layout, 6 Star Blocks and place a 2½" x 8½" sashing rectangle at the beginning and end of each row and a 1½" x 8½" sashing rectangle between each block in the row. (that is a little different so pay attention that the 2½" width rectangles are at the beginning and end of the row ;)
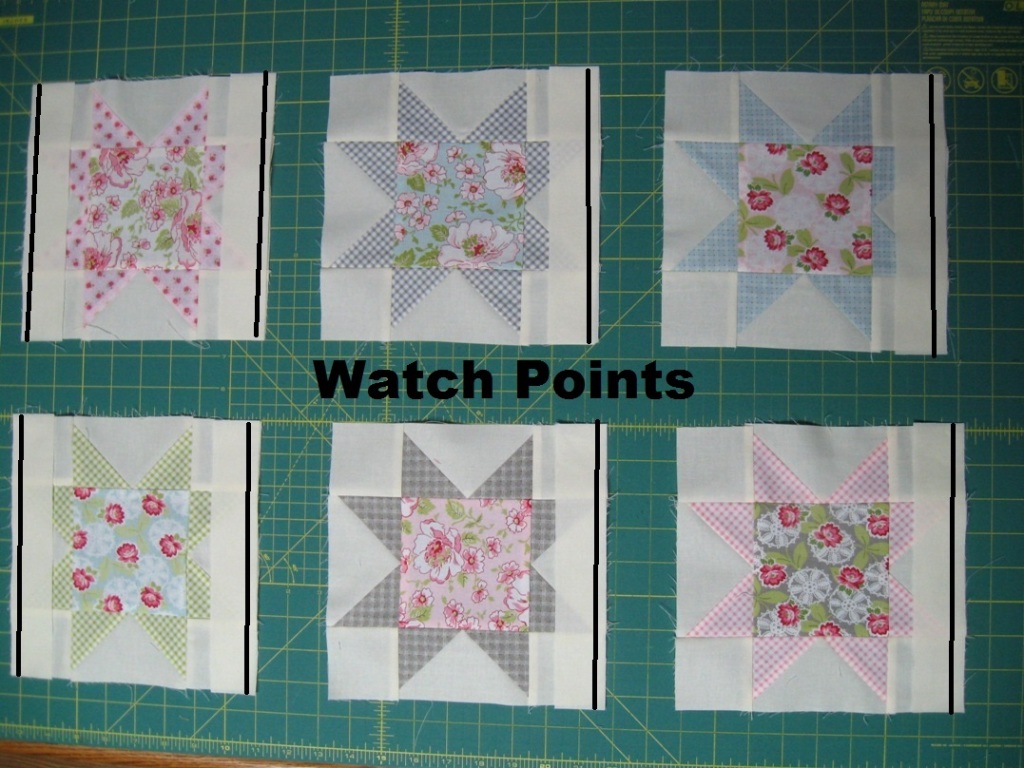
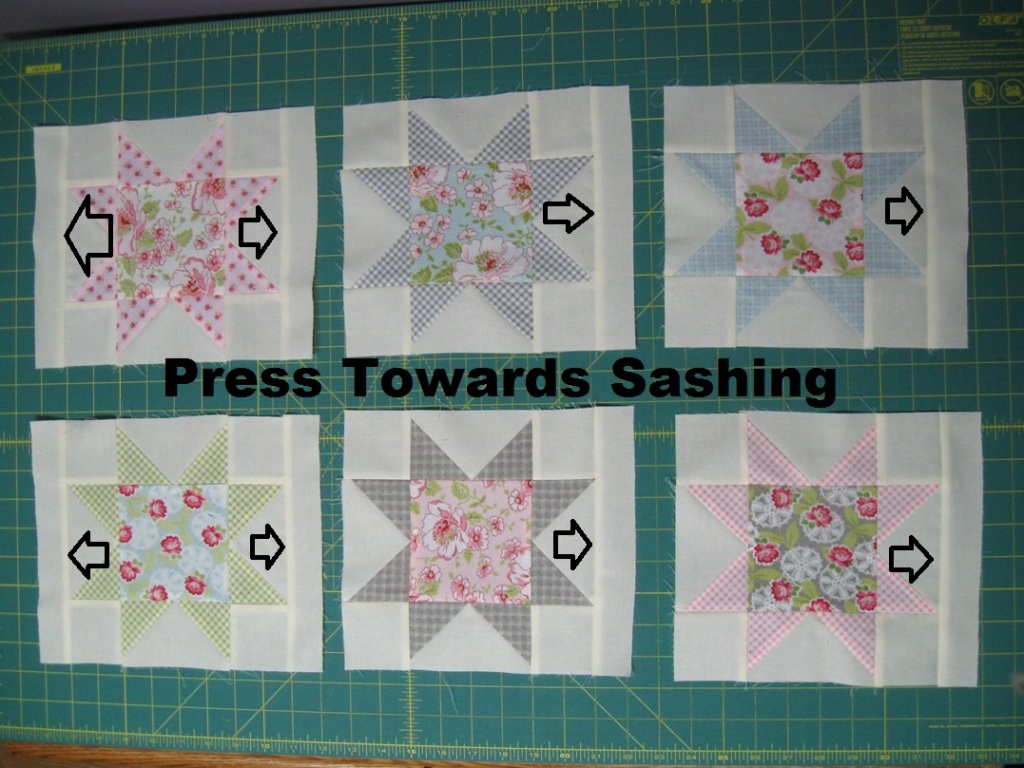
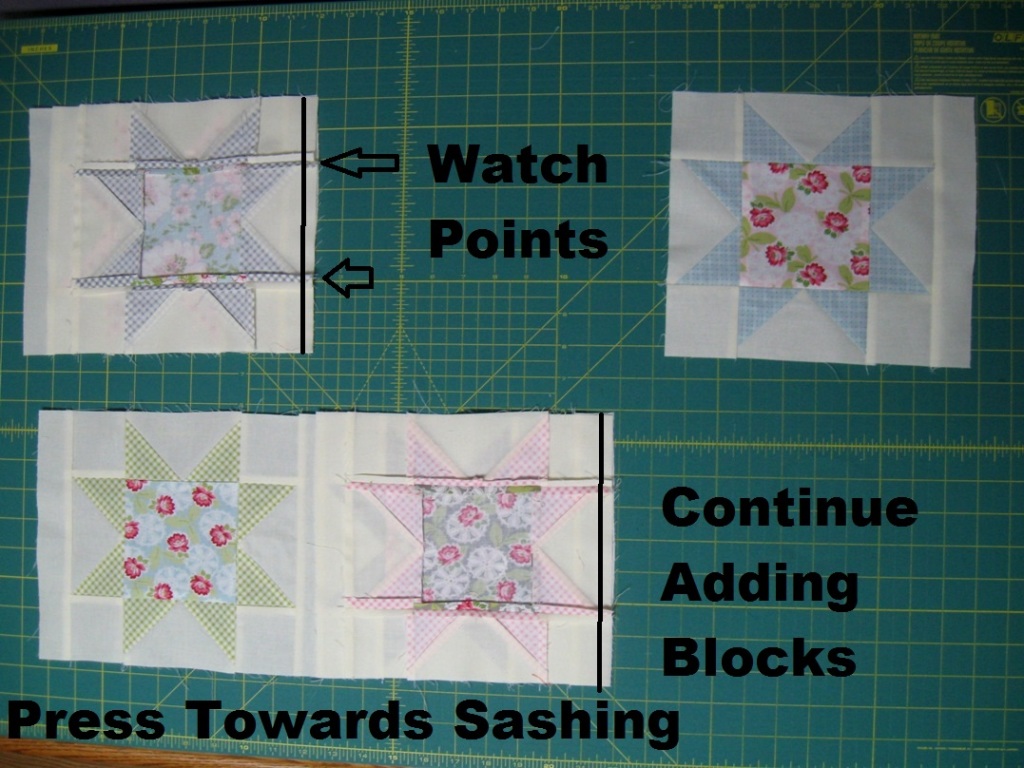
Now, just like before, place the sashing units onto the Blocks with right sides together. Stitch a 1/4" seam along the edge. Your first block in the row you will be sewing a seam on either side of the block. You can see through the sashing just slightly, so take care to stitch right along the edge of your star points so they are nice and crisp.
Press the seam allowances towards the sashing.
And once again, we will add one block at a time to make the rows. Place the second sashed block onto the first sashed block with right sides together. Stitch a 1/4" seam along the edge. Take care to stitch at the edge of the cream solid triangle in the sashing at the seams to make perfect points. Then, place the third sashed block onto the now sewn together first and second sashed blocks with right sides together. Stitch a 1/4" seam along the edge. Continue in this fashion until you have added all 6 blocks in the row. Press the seam allowances towards the sashing.
If you were chain stitching or if you need to repeat this process above, make a total of 2 Star Rows, 2 Heart Rows, and 1 House Row.
STEP 7 - SEWING THE QUILT TOP
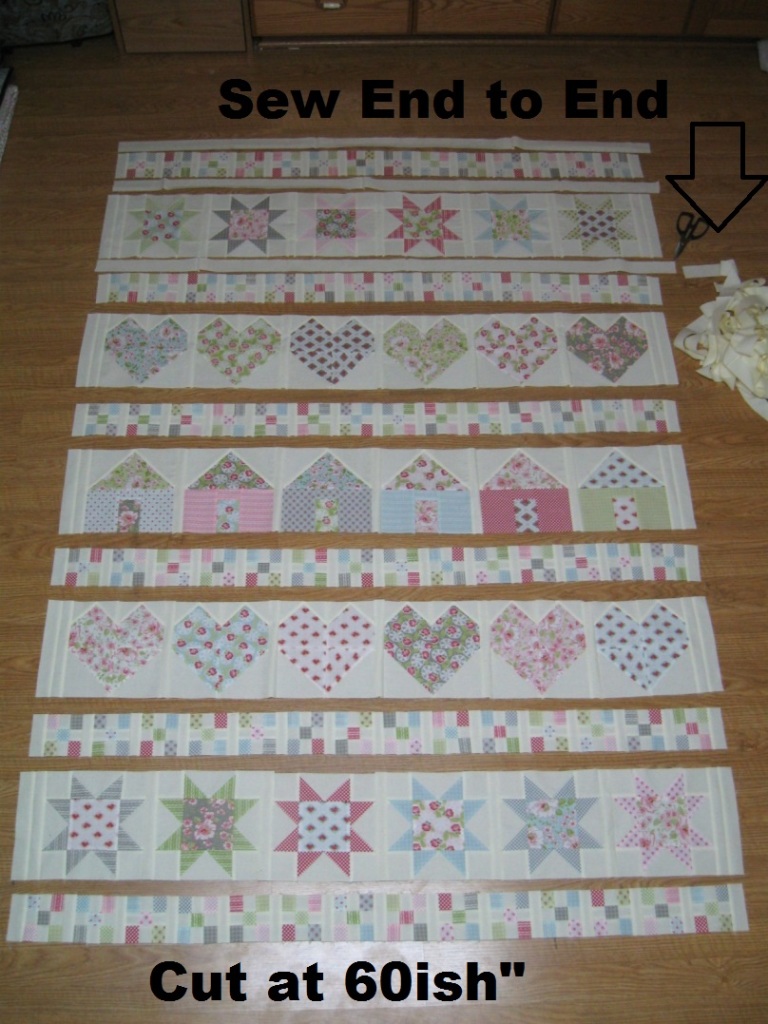
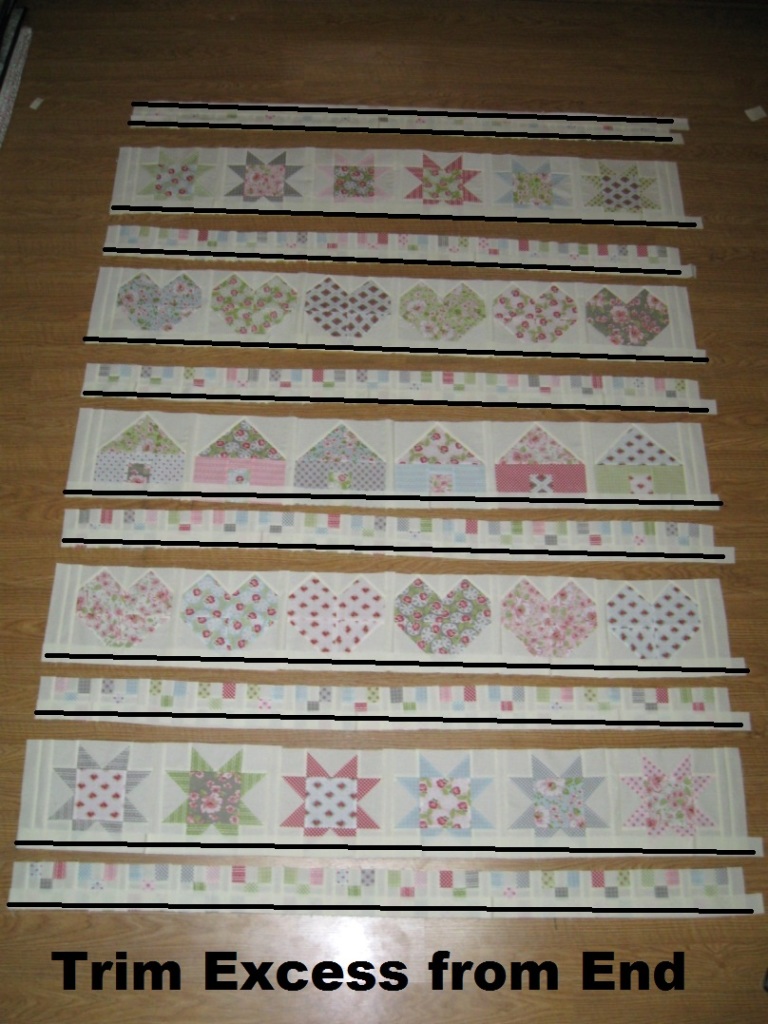
And now, we are almost there ;) Just time to sew up all the rows. But first, to add a little more sashing. Take your 1½" x Width of Fabric strips and stitch then together end to end to make one giant strip. Now sub-cut them into (12) 1½" x 60ish" strips and place them between each of the rows in the quilt as shown below.
Place the sashing strips onto the pieced rows with right sides together. Aligning as you go, stitch a 1/4" seam along the edge. Your first Nine Patch row will have a sashing strip sewn on the top and bottom of the strip. At the end of each row, trim any remaining sashing so it is even with the stitched row.
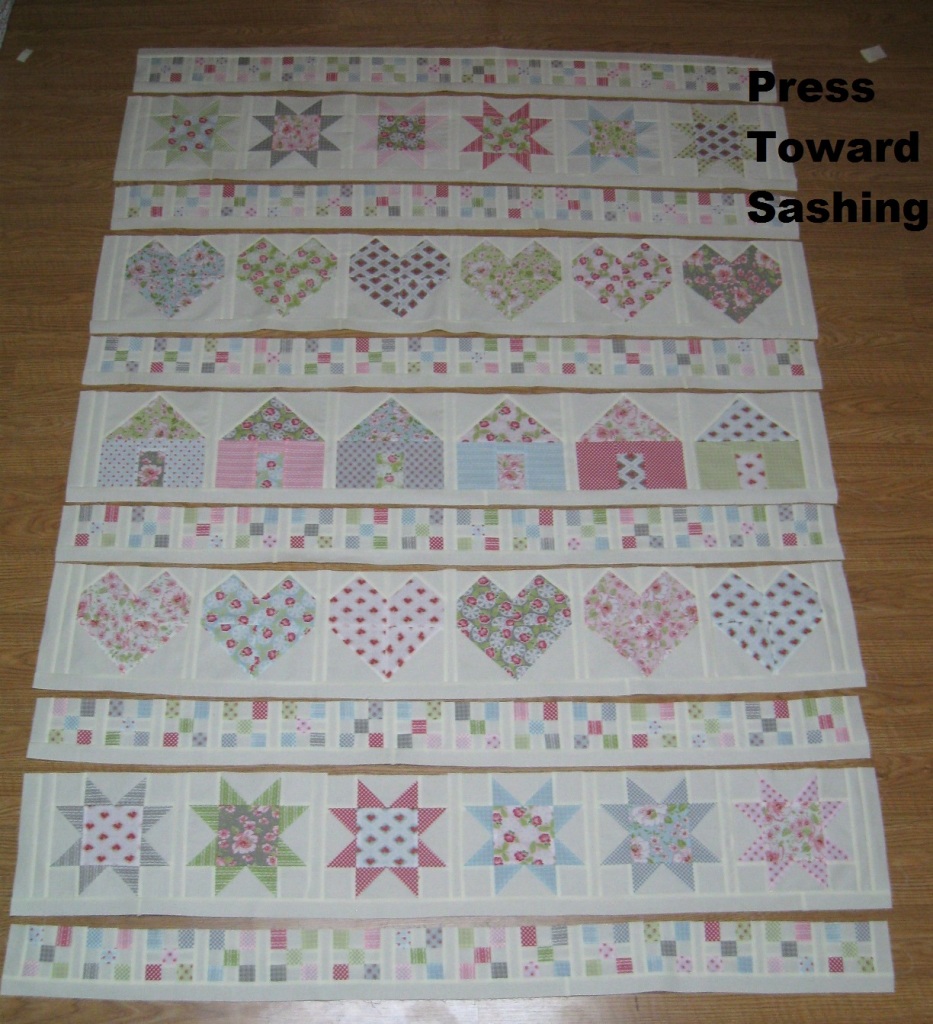
Press the seam allowances towards the sashing ;)
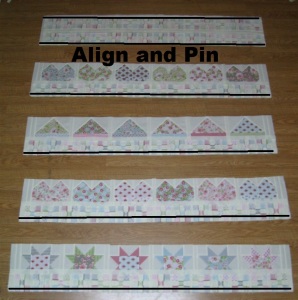
Now, place the sashed Nine Patch Rows onto the Block rows with right sides together. Align and pin each row, starting at the center and two ends and easing everything else in. Sew a 1/4" seam along the pinned edges.
Press the esam allowances towards the sashing. Almost done, so exciting!!!
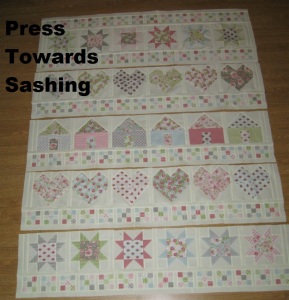
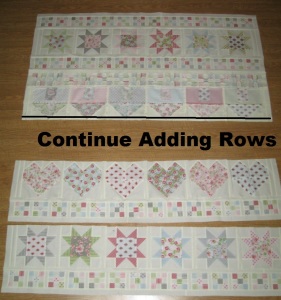
Now, just like making the rows, I just add 1 row at a time to sew the quilt top together. Place the second row onto the first row with right sides together. Align and pin the edge. Sew a 1/4" seam along the edge. Press the seam allowance towards the sashing.
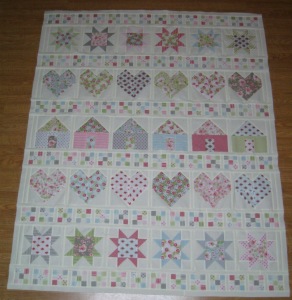
Now, place the third row onto the now sewn together first and second row with right sides together. Once again, align and pin the row and sew a 1/4" seam along the edge. Press the seam allowance towards the sashing. Continue in this fashion until you have sewn all the rows together.
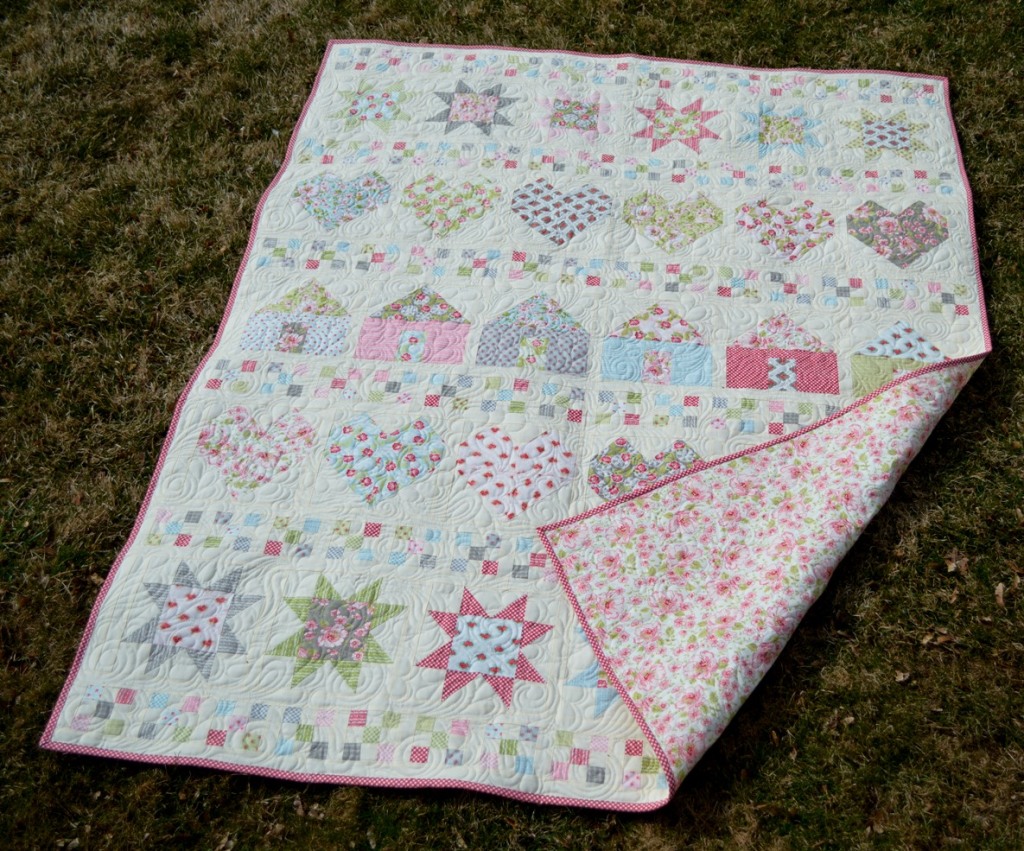
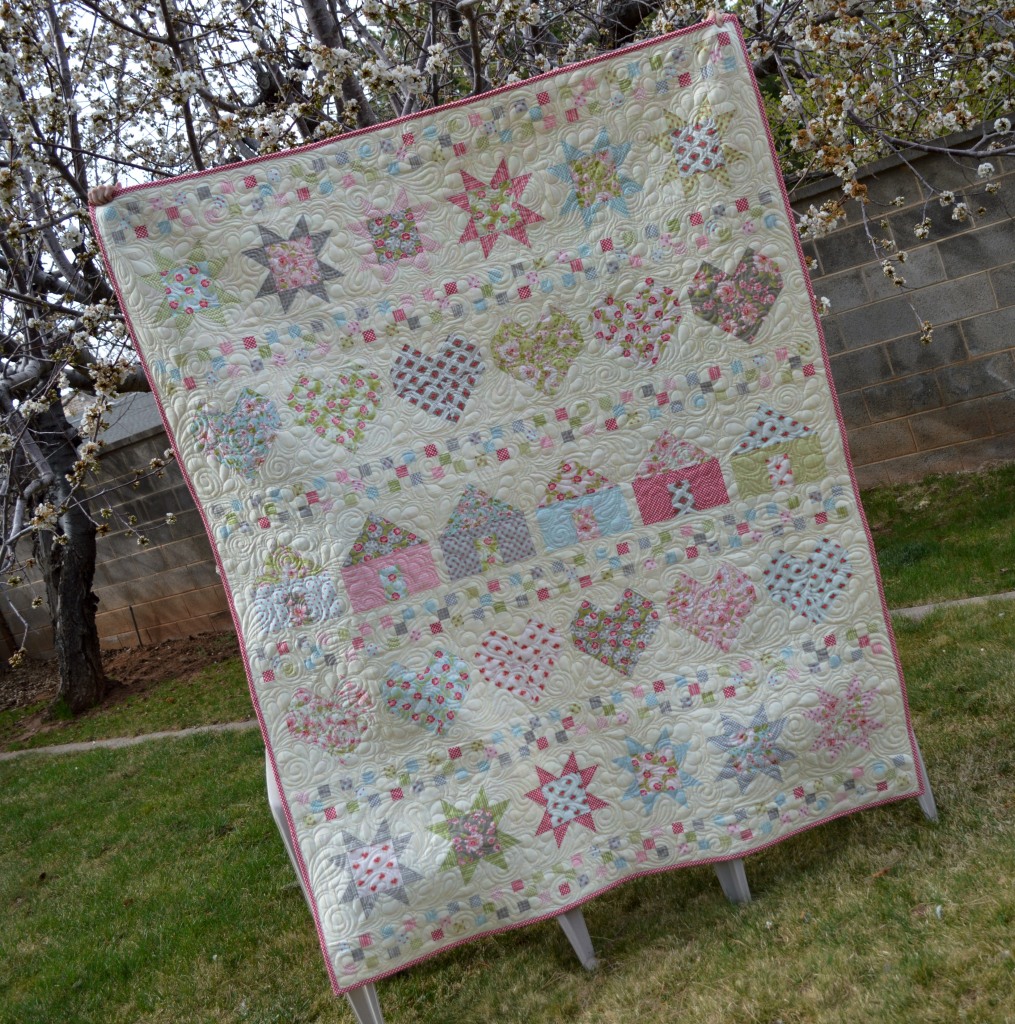
And now you have an adorable All In A Row Quilt Top!!!
STEP 8 - FINISHING
And all that is left is to finish it up ;) Baste It, Quilt It, and Bind It ;) Yup, that's a whole lot to go in one little sentence. If you are new to quilting, you can see this Finishing Your Quilt Video Series that will go over each of these steps in detail.
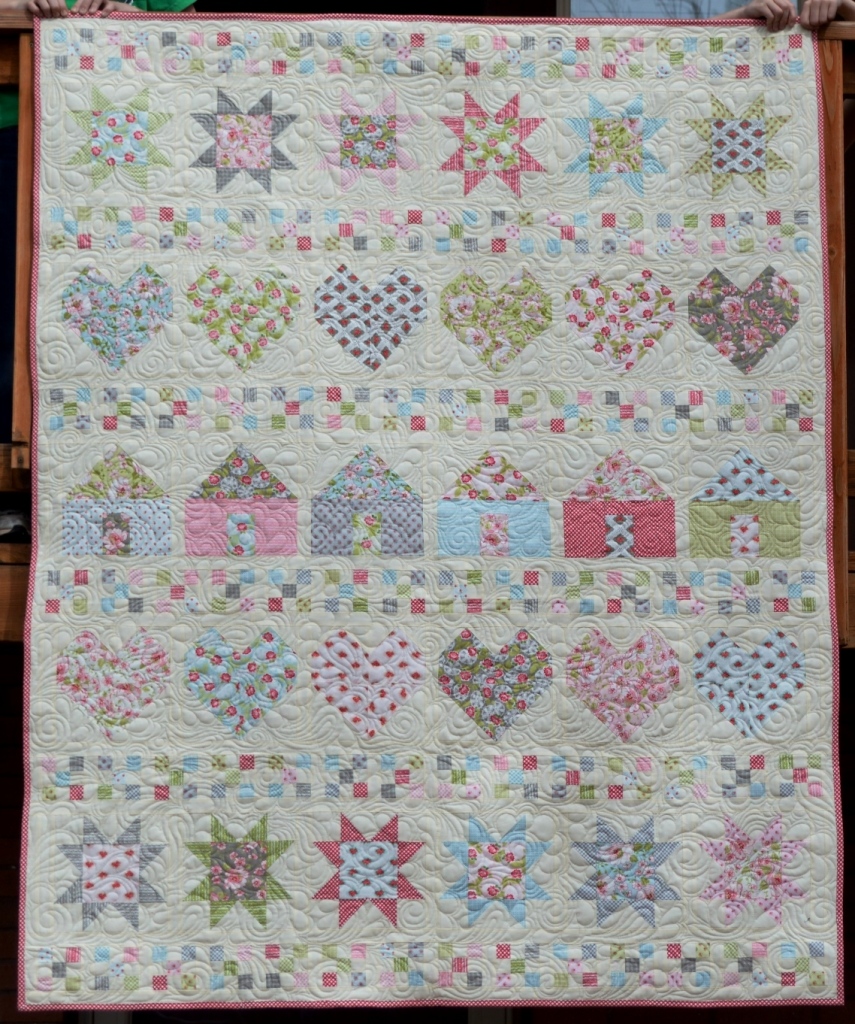
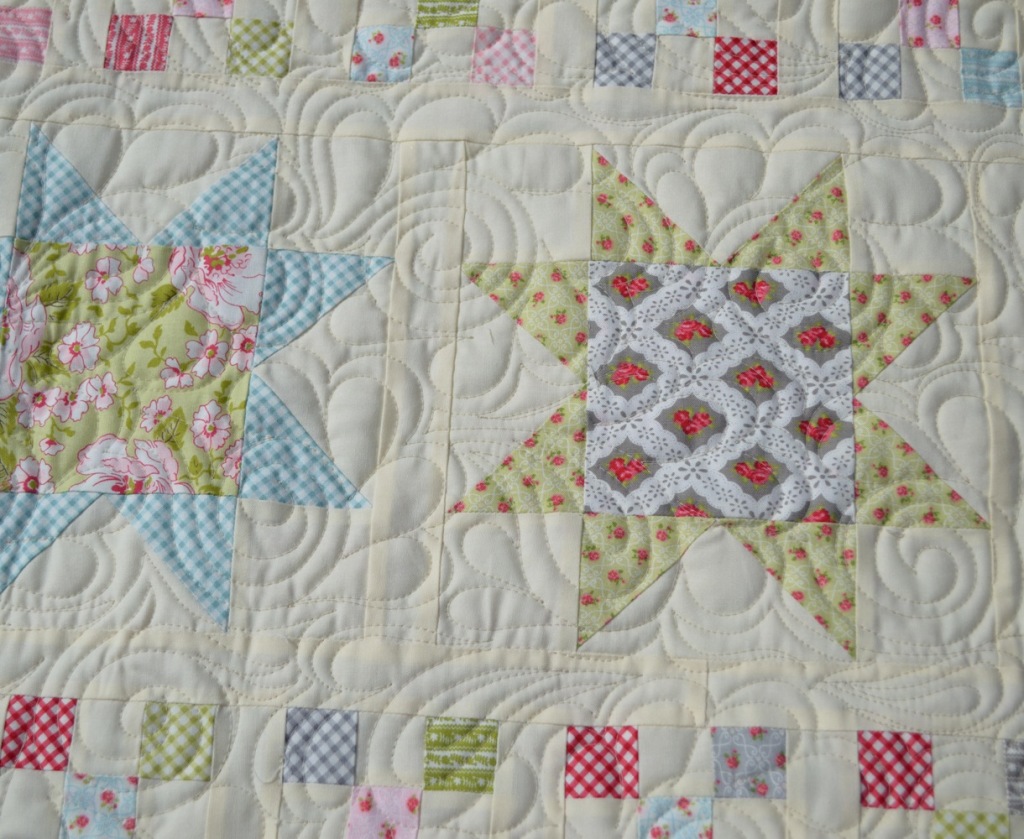
When it came time to quilt mine I decided to do an all over feathered swirl and feathered paisley design that I think really adds to the overall sweet demeanor of this quilt. I used So Fine #50 Putty (403) by Superior Threads. This is the perfect color to blend to that beautiful cream in the background without completely disappearing. Love it!!!
And just like that you are all done and you can cuddle up and enjoy your beautiful 57" x 70" All In A Row Quilt ;)
And if you are wondering for whom this quilt is for, as I referred to at the beginning of this post, this will be given to my grandmother at the celebration of her 85th birthday. She grew up in Kent, England and I just know the beautiful Ambleside prints will bring back wonderful memories of fields of flowers for her. Love you Grandma!!!
Do you have someone special in mind to make an All In A Row Quilt for?? If you do I would love to see it. You can email me a picture at [email protected] or add it to my Flickr Group Here ;) I can't wait to see them ;)
I hope you have enjoyed this tutorial ;)
Have a Happy Quilting Day!!
Melissa Corry
{www.happyquiltingmelissa.com}

